
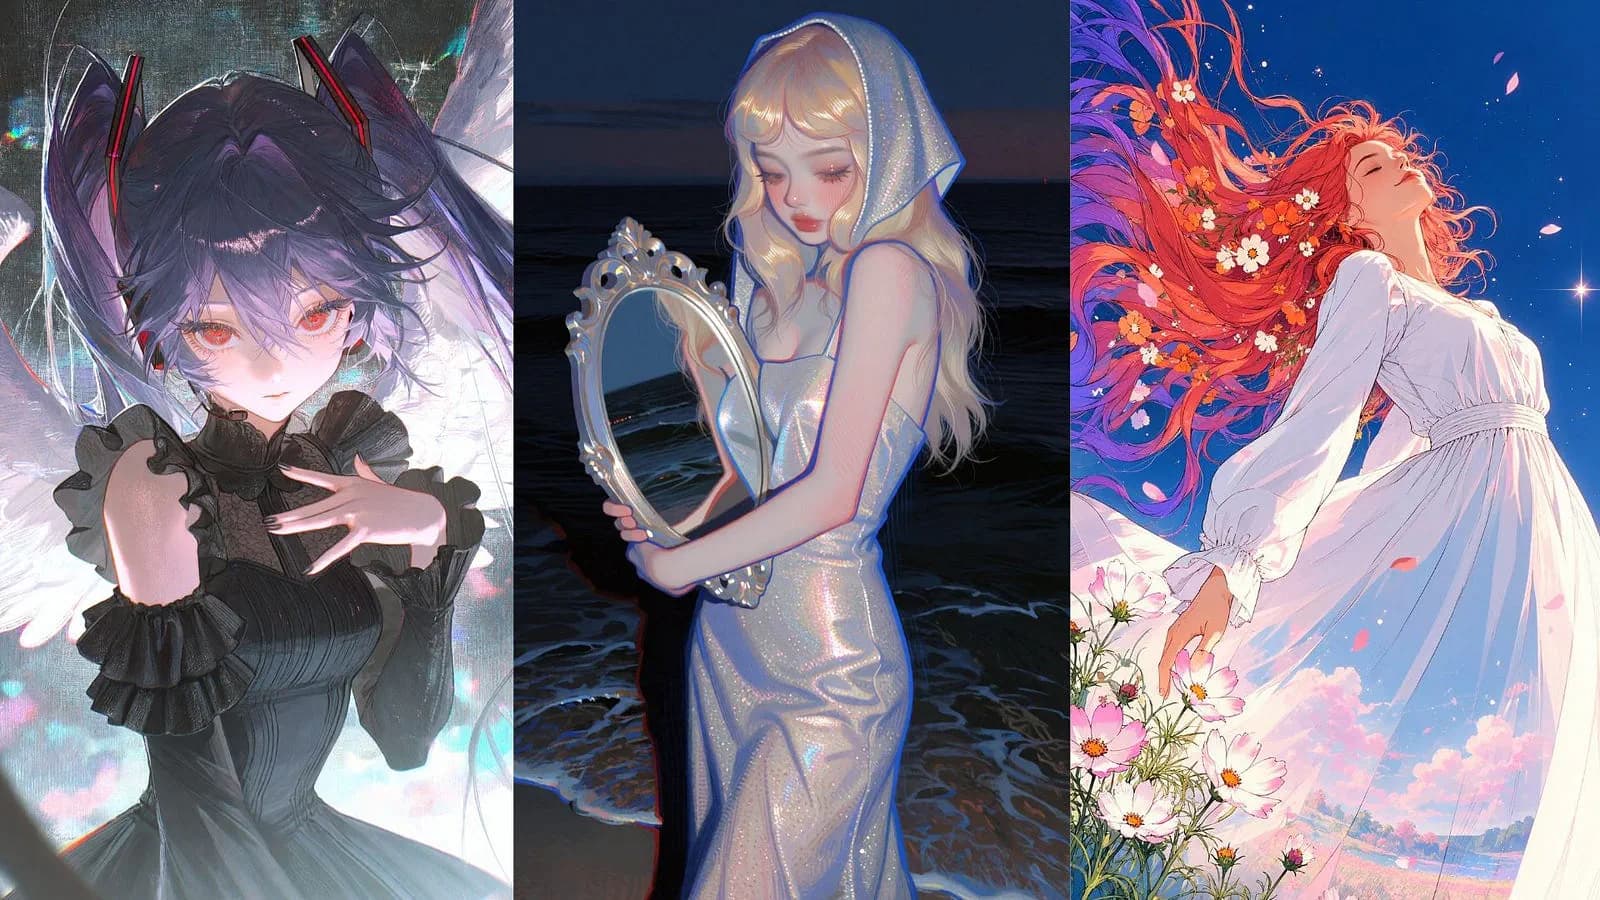
Image generation in a very specific style like Anime can be very challenging at times. You need a platform with the most diverse image generation controls, the one with very fast inference, and support for thousands of custom models.
One of the most popular right now is Tensor.Art.
It’s popular because of how many models it supports and how stable the website is. I’ve personally used it, but there are a few things I think other platforms offer better than Tensor.Art.
The platforms I am talking about are PixAI and ComfyUI.
These two sit on opposite ends.
- PixAI is simpler. You open the browser, pick a model, type a prompt, and fix things with built-in editing tools.
- ComfyUI is the route for people who don’t want to give up any control. Every step of the process is a node you can see and change, and you can run it on your own computer.
So when people ask me for a tensor art alternative, my first question is what their workflow is. If you have a workflow with specific settings that you’ve tuned for weeks, you want something that can run that same workflow.
But if you only care about the final image, you might not need the workflow at all. You just need a tool that gets you there with fewer steps.
Those are two very different decisions, and that’s what I wanted to test here.
I ran two anime workflows on Tensor.Art first, then tried to get the same results on PixAI and on ComfyUI.
Tensor.Art Alternatives at a Glance
For Tensor.Art, I used its regular online generator. For PixAI, I used its web generator with the advanced settings open. For Comfy Cloud, I used the default text-to-image template and changed the values inside its nodes.
Tensor.Art and PixAI work the same way on the surface.
You get a prompt box and a settings panel, and everything you need is on one screen. Comfy Cloud gives you the same settings, but they’re spread across separate nodes, so you need to know which node controls what before you can change anything.
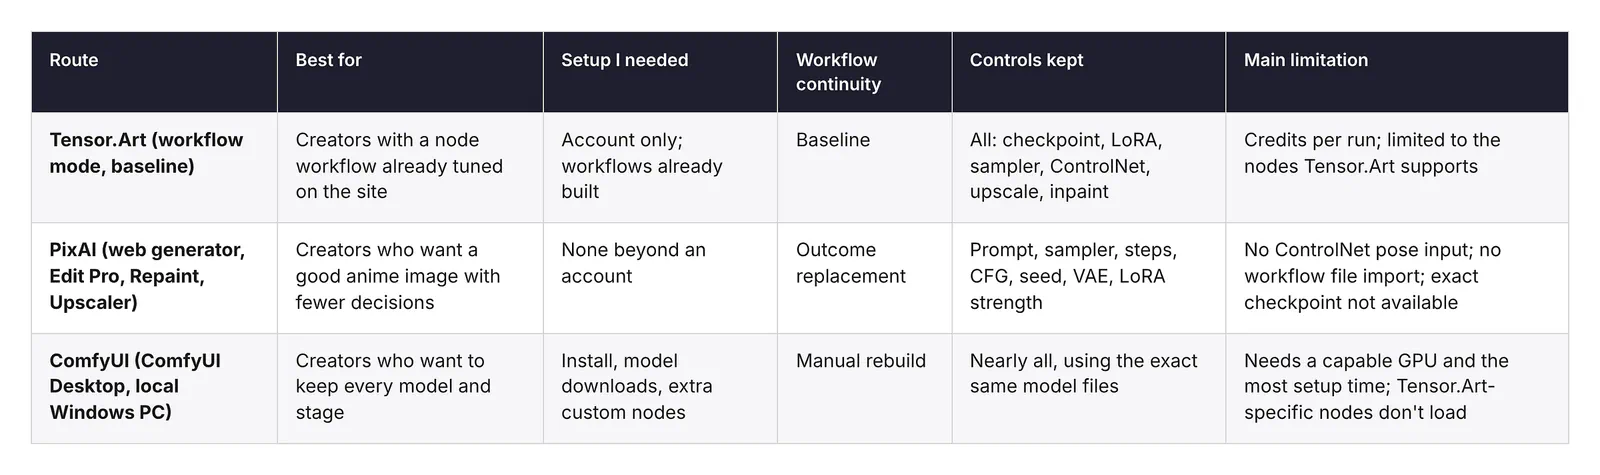
The bigger difference is in the models. Tensor.Art and Comfy Cloud let you use general-purpose checkpoints from the community, while PixAI’s own models, like Tsubaki.3, are trained specifically for anime. That means you spend less time hunting for the right checkpoint, but you also can’t bring over the exact one you used on Tensor.Art.
Neither one is a straight copy of Tensor.Art. Which one is “better” depends on whether you care more about seeing every step or getting to a good anime image quickly.
I wanted tests that anyone can repeat in a few minutes, so I kept both of them simple.
Test: One detailed prompt
This is the everyday one. I wrote a prompt with several specific details and checked how many of them each platform got right.
The prompt:
A girl with short black hair and a red hoodie, sitting on the edge of a rooftop at night, city lights in the background, looking at the viewer, soft rim lighting, anime style.
The negative prompt:
lowres, bad anatomy, bad hands, extra fingers, blurry, watermark, text
Settings: 832×1216, 25 steps, CFG 7, and the Euler a sampler (or the closest match on each platform).
For this to count as a success, the image had to show every detail in the prompt (short black hair, red hoodie, rooftop, city lights at night, eye contact with the viewer), and the face and hands couldn’t be broken.
Tensor.Art (baseline)
On Tensor.Art, I picked an anime SDXL checkpoint from its model library, pasted the prompt and negative prompt, and set the size, steps, CFG, sampler, and seed in the generator panel. Everything I needed was on one screen.
This is the image I used as the reference for the other two platforms.
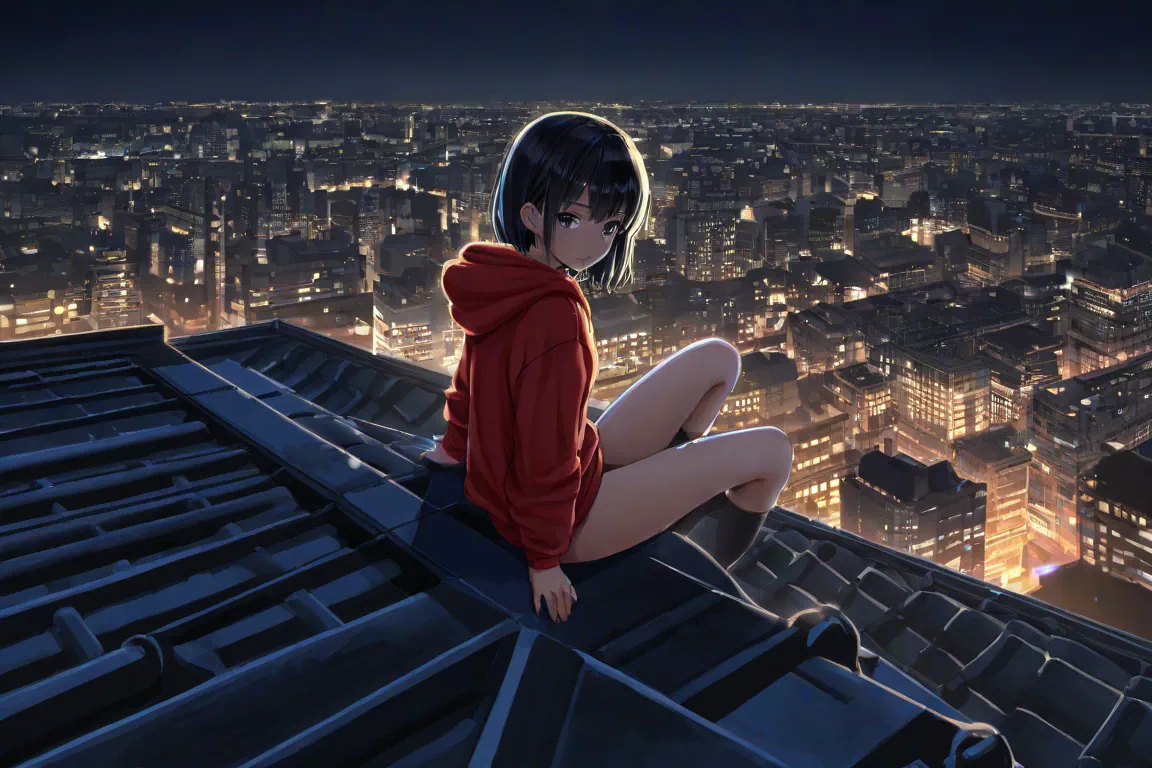
For me, this looks pretty good. I like how detailed the background is, those glowing buildings, and how the light makes the edges of the character glow too looks super cool.
PixAI
PixAI needed zero setup. I just logged in and went to the generator. If you’ve never used it, the PixAI generation workflow is pretty easy to follow.
The first thing I checked was whether I could use the exact same checkpoint. It wasn’t in PixAI’s library, so I used Tsubaki.3, PixAI’s own anime model, as a substitute.
What surprised me is how many of the settings were still there. PixAI’s advanced settings let me set the sampler, steps, CFG, seed, VAE, and negative prompt.
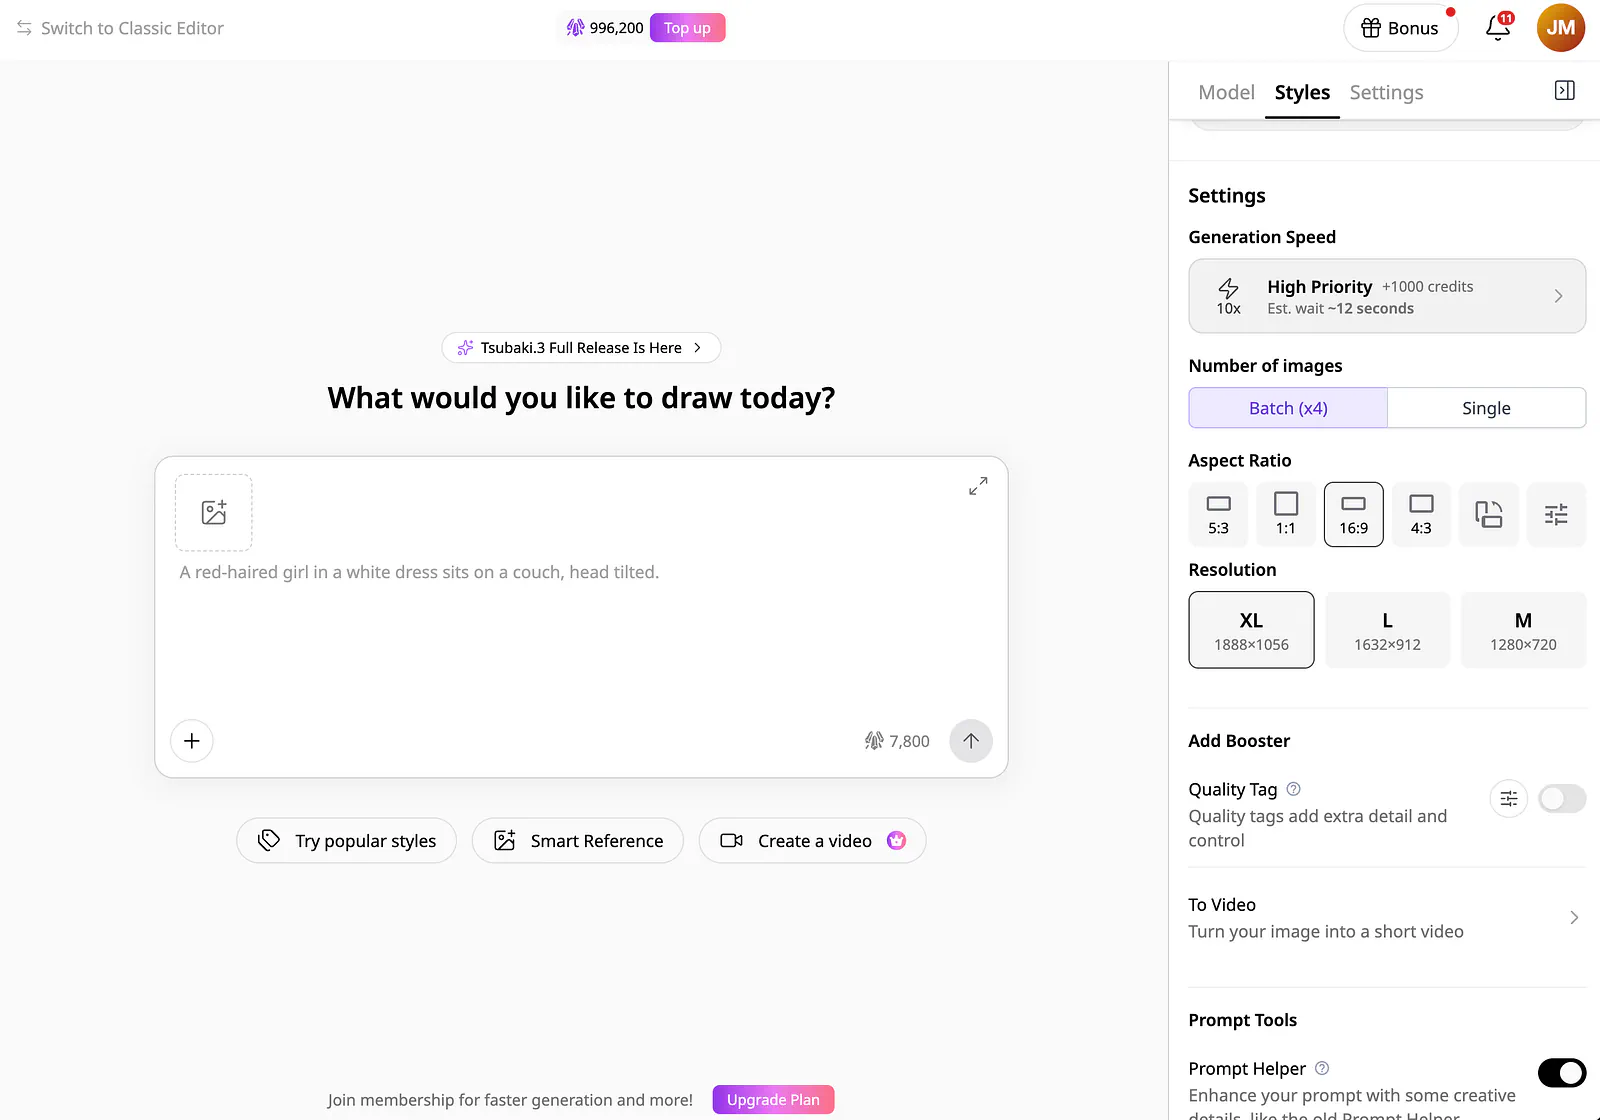
So I copied most of my numbers straight from Tensor.Art without changing anything.
I didn’t touch LoRAs for this test, but PixAI has a library of them if you want to push a style further later. Just make sure you’re using a compatible LoRA on PixAI, because a LoRA only works with the base model it was trained for.
Here’s the image result using the same prompt as before.
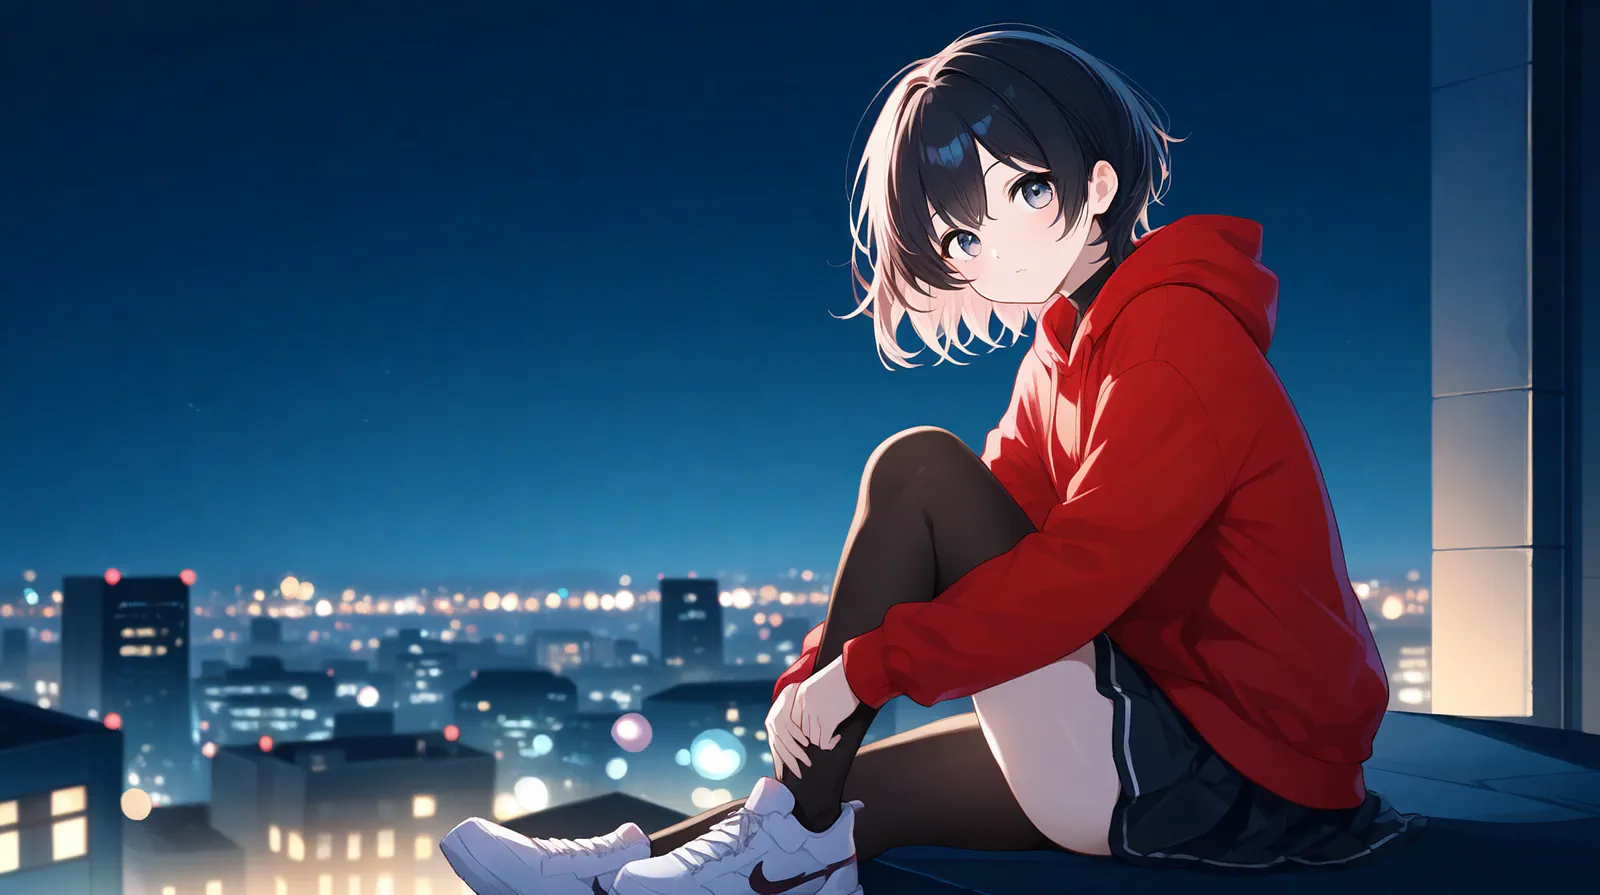
What I love about PixAI is how much focus is given to the character. You can see that in this example, around 50% of the whole image is occupied by the character, and the background is blurred.
I’d call this an outcome replacement, not a migration. I used the same prompt and settings, but a different model, so the look isn’t identical to the Tensor.Art version. If you’re attached to one specific checkpoint, that’s the trade-off to keep in mind.
Comfy Cloud
Comfy Cloud didn’t need an install either. I signed in at cloud.comfy.org, opened the template browser from the left sidebar, and loaded the basic text-to-image template.
According to Comfy’s Cloud documentation, the models used by its templates are already preinstalled, so a template is ready to run as soon as it loads.
The template isn’t a simple form like PixAI or Tensor.Art. It’s a small graph of nodes, and each setting lives in a different one:
- Load Checkpoint is where you pick the model.
- CLIP Text Encode (there are two) holds the prompt and the negative prompt.
- Empty Latent Image sets the width and height.
- KSampler holds the seed, steps, CFG, sampler, and scheduler.
When I used the prompt, the agent automatically created a custom workflow for me. And after running the workflow, it generated an image.
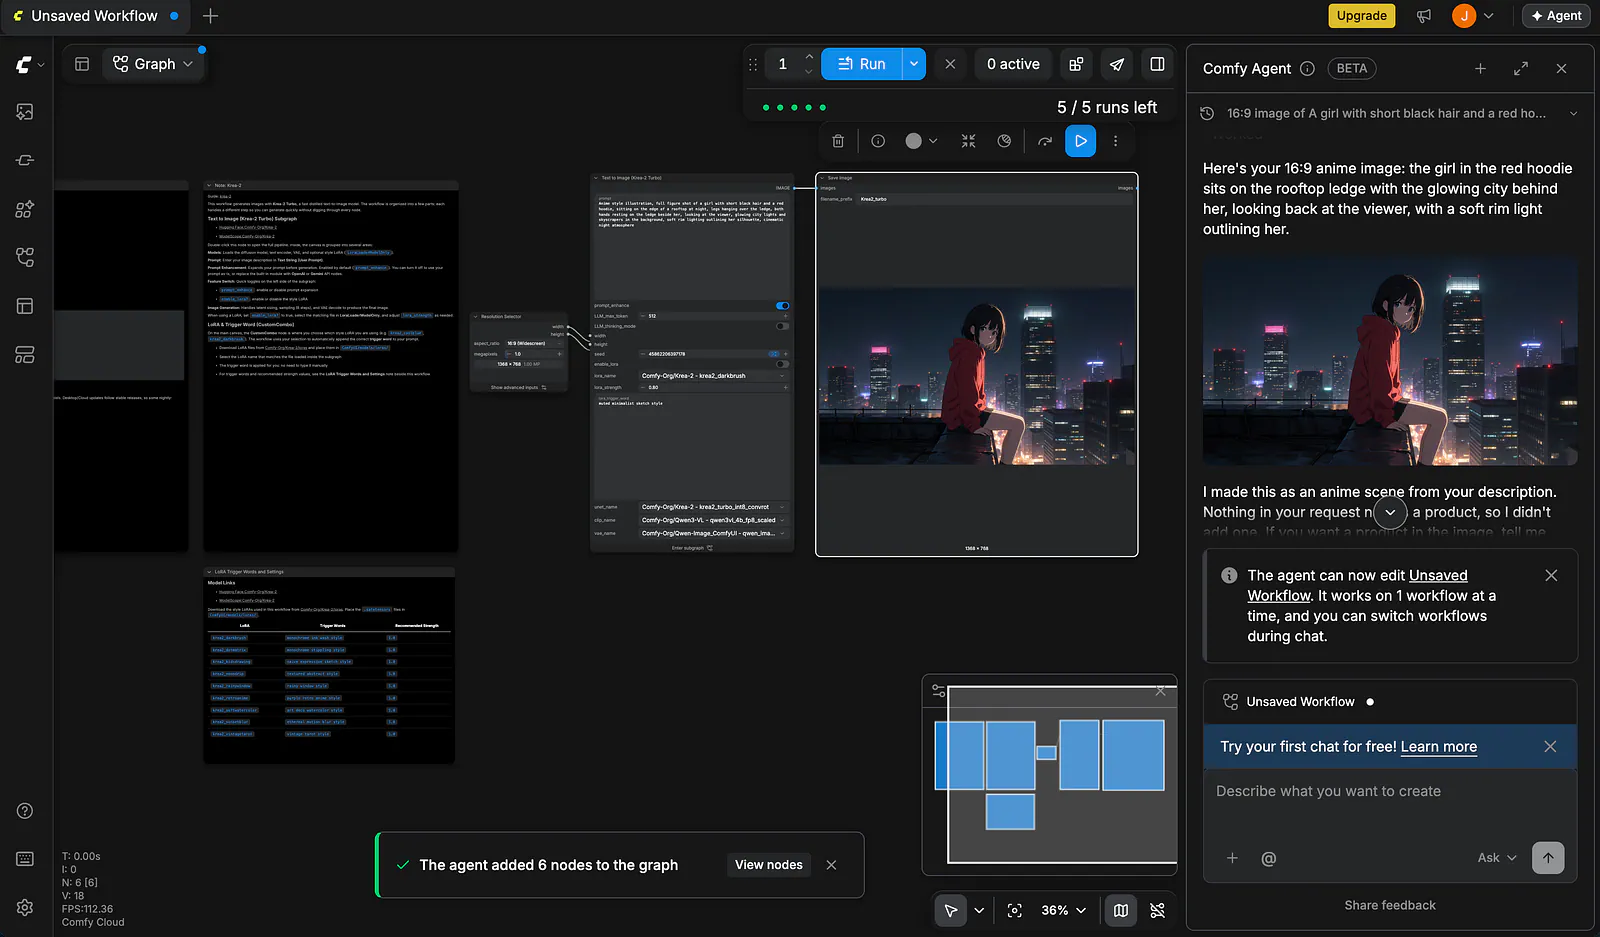
For the model, I picked a checkpoint from Comfy Cloud’s model library.
Comfy says the library has over 900 preinstalled models, but the ones it highlights are general models like Flux, Qwen, and Wan 2.2, not anime-specific ones. So it’s worth browsing the library before you commit.
Then I hit Run (or Ctrl + Enter). Comfy Cloud only charges for the time the GPU is actually running, so the time I spent editing nodes didn’t cost anything.
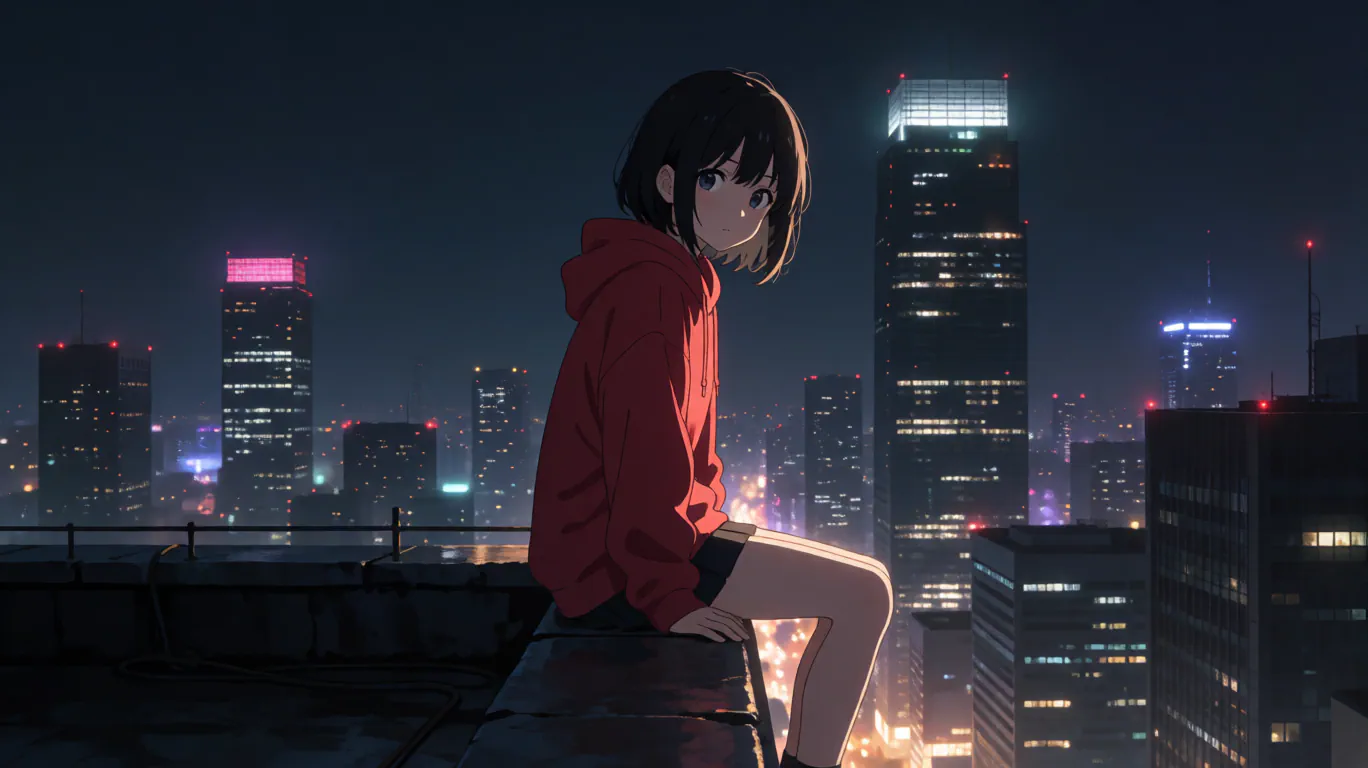
If you’ve used ComfyUI before, this setup is quick. If you haven’t, expect to spend a few minutes figuring out which node holds which setting. Once you know, it’s the same handful of boxes every time.
What Transfers and What Doesn’t?
I think most people should care about this aspect when they’re thinking of leaving Tensor.Art. Here’s what happened to each piece when I moved my tests over.
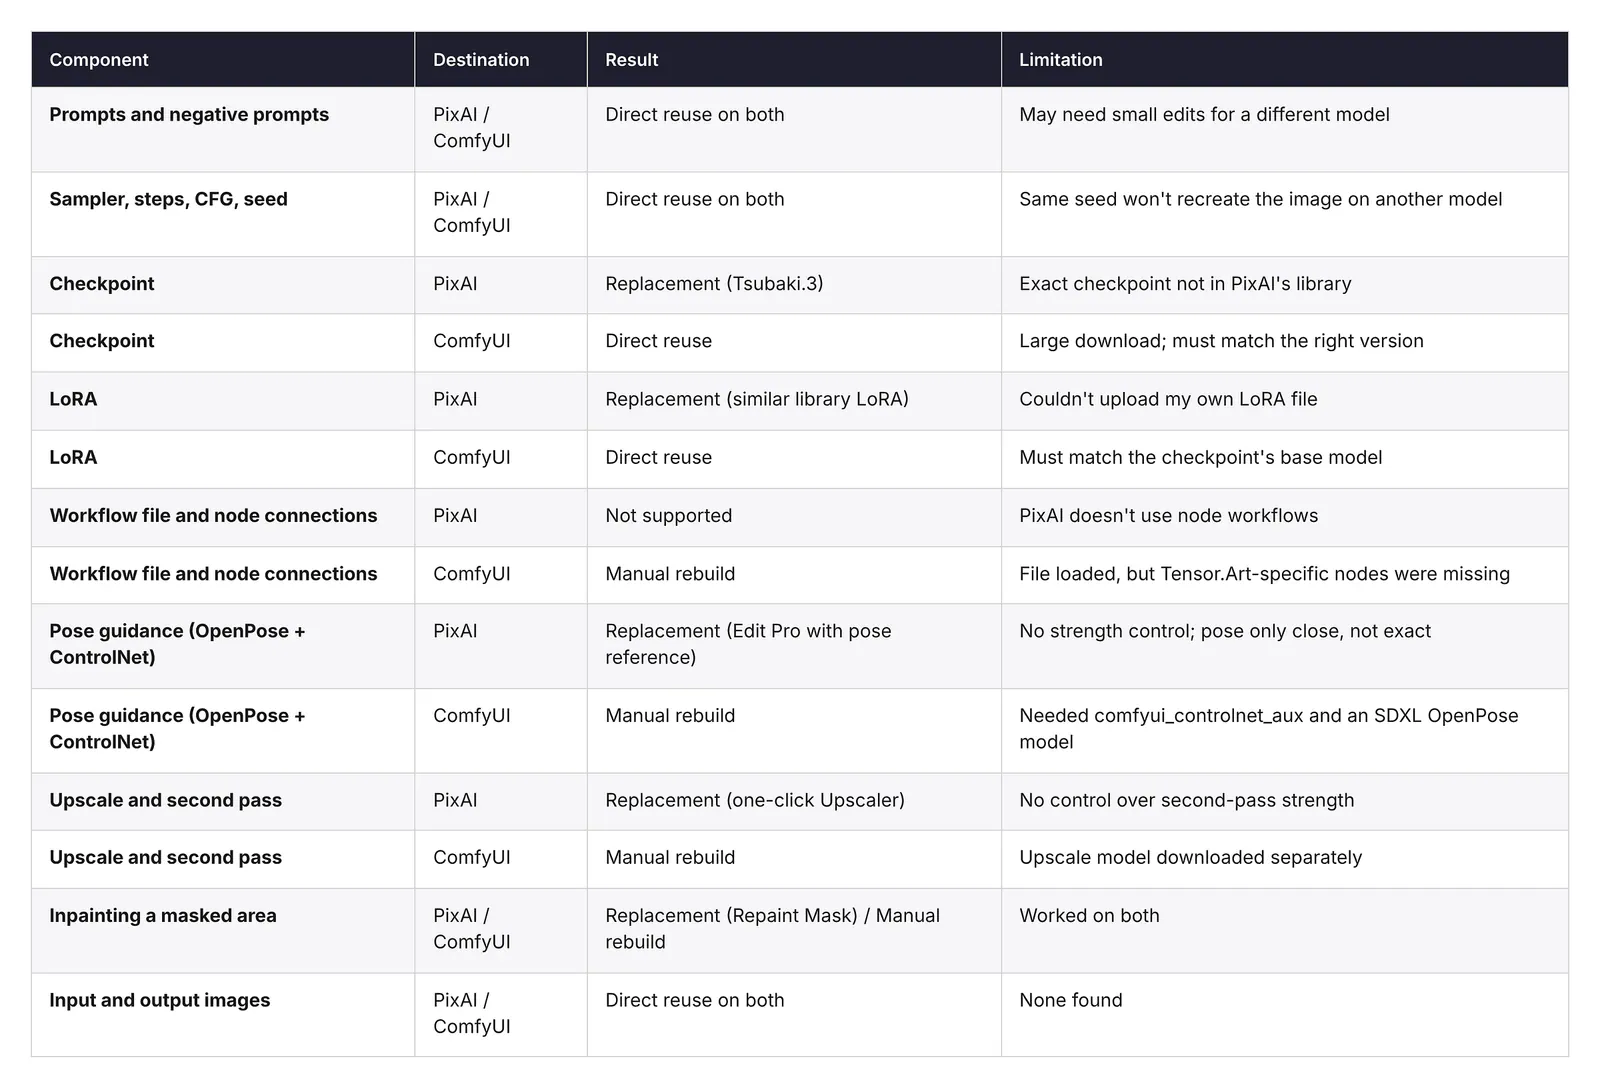
Prompts and basic settings move easily everywhere. You can copy them as they are. But the same seed won’t give you the same image on a different model or backend, so don’t expect to recreate an old image just by reusing its seed.
Sampler names don’t always match. Web generators like Tensor.Art and PixAI usually show labels like “Euler a,” while ComfyUI calls the same sampler “euler_ancestral” and puts the scheduler in a separate dropdown. It’s the same thing, just named differently, but it can throw you off the first time.
On Comfy Cloud, you can use the same checkpoint if it’s in the library, or import it yourself on the Creator plan. On PixAI, I used Tsubaki.3 instead, which changes the look but saves you from having to find and manage checkpoints yourself.


