I won’t hold back when I say Google makes a terrible LLM when compared to other frontier AI labs like OpenAI and Anthropic. I’ve used their models to generate text, images, videos, and code, and to run long-horizon tasks. None of the recently released Gemini models excited me. I try them once and immediately switch back to Claude or GPT models.
But something has been going on at Google over the past couple of months. They’ve released four core models:
- Gemini 4 Neon: Built for deep reasoning, software engineering, science, and agentic workflows.
- Gemini 4 Carbon: Built for complex, long-running projects and deep research
- Gemini 4 Hydrogen: It’s fast and built for everyday tasks and agentic workflows.
- Gemini 4 Argon: Built for API access with moderate speed.
Yes, I know. There’s not much hype around these models on social media. But the fact that Google released four models in a little over a month says something about their compute prowess and training efficiency.
Has Google finally caught up with OpenAI and Anthropic?
I won’t answer that question here. Benchmarks don’t tell me much anymore, and I learn a lot more about a model by looking at what people build with it during the first 24 hours.
So I am here to talk about the five cool things people are building with Gemini 4 Neon. Here’s a quick rundown:
- Sprite stacking to make pixelated 3D objects
- 3D interactive planet demo with accurate data
- Animating an image using Three.js (or even 3D)
- Full 3D game using Google Maps Street View
- Painting with Vanilla JS / Canvas 2D
Let’s get into the details.
1. Sprite stacking to make pixelated 3D objects
This one’s particularly interesting because I have never seen anything like it before. You feed multiple pixelated sprites, and the AI agent stacks them up to create a 3D model like in the video.
This is pretty cool.
Each slice is a top-down picture of one layer of the car: the bottoms of the wheels, then the body, the windows, the roof.
This is what each stack of pixelated layer looks like when laid out in a flat surface side by side.
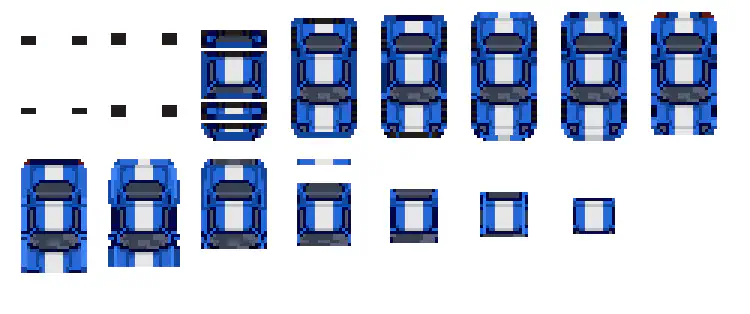
Draw the ground slice first and every next slice 1 px higher. Pulled apart, you can see the layers. At 1 px apart, they read as one solid car.
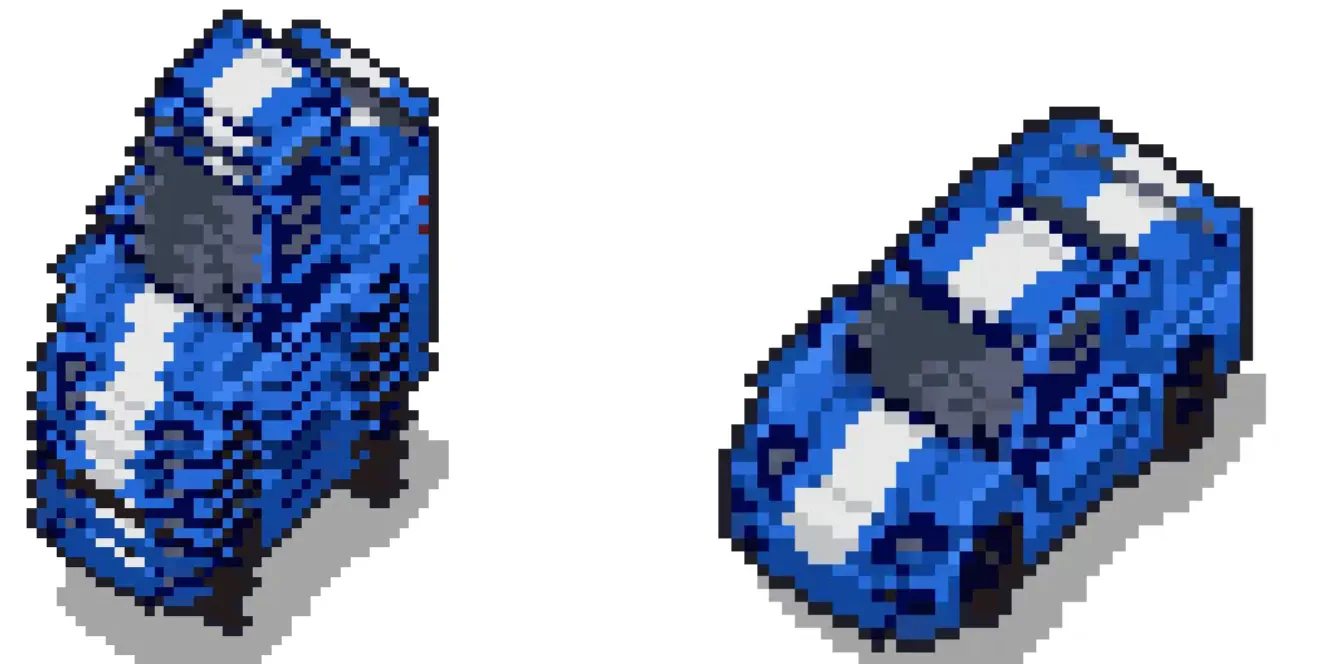
To turn the car, rotate every slice by the same angle around its center, then lift it. Nothing else changes, so one sheet covers every angle.
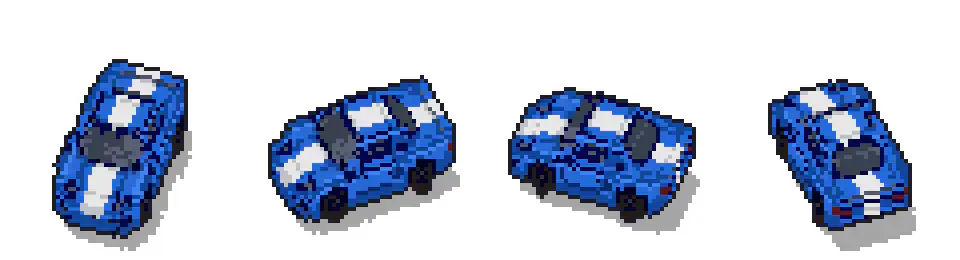
In a normal 2D game, if you want a car that can face 16 directions, somebody has to draw the car 16 times. With sprite stacking, you draw the layers once and the code handles every angle for you. The reference car in the article below is only 15 slices at 24 x 43 pixels each, which is a tiny amount of art for an object you can spin around freely.
You can learn more about the detailed process in the article below.
Sprite Stacking Pixel ArtI remember creating games back in college using sprites, and I would have to carefully code all movements and animations to make a 3D effect. Now an AI agent can write the slicing and rotation logic for you in one go.
This specific use case is unique and could apply not just to games but also to different forms of animation.
2. 3D interactive planet demo with accurate data
This is one of the most common examples I have seen on Reddit and X showcasing the capabilities of Neon.
I think it’s popular because it tests three different skills in a single prompt.
- The model has to render a 3D scene that looks good
- Build a working interface with controls and panels
- Fill it with real numbers that anyone can check
A model can easily do well on the first two and still get the facts wrong.
Here’s an example:
Here’s a sample prompt you can use if you want to try it yourself.
Build a self-contained, single-file interactive web app called "Celestial Orrery"
(subtitle: Deep Space Observatory).

Requirements:
- Schematic solar system model (not to scale, not real-time ephemerides) showing the Sun + 8 planets in correct astronomical order with elliptical orbit rings.
- Beautiful dark space aesthetic with a starfield background, glowing Sun, and stylized but recognizable planet appearances (including Saturn’s rings and Uranus’s tilt).
- Click any planet (or use number keys 1–8) to zoom in and open a detailed info panel on the right with:
  - Planet name and type (e.g. Gas Giant, Ice Giant)
  - Mean distance (AU)
  - Mean diameter (km) and relative size vs Earth
  - Orbital period  - Sidereal rotation period
  - Known moons (current JPL numbers)
  - Mean temperature  - Short descriptive text
  - Source note: “References: NASA Planetary Fact Sheet & JPL SSD”

- Controls at the top: Pause/Play, speed slider (0.1x–5x), toggle Labels, toggle Orbits, Zoom +/–, and Overview button.
- Bottom planet selector bar for quick jumping.- Smooth camera transitions, subtle orbital animation, and hover highlights.
- Responsive and works well in desktop browsers. Use Three.js (or pure Canvas/WebGL if preferred) for the 3D scene. Everything must run from one HTML file with no external build step.

Make the UI clean, modern, and space-themed. Prioritize visual polish and accurate planetary data.
Notice that the prompt asks for a schematic model that is “not to scale.”
That’s intentional. If you drew the solar system at its real proportions, the planets would be too small to see on a screen, so every demo like this has to cheat on distances and sizes.
If the agent you are using has web search or tool use, it will usually pull fresh NASA/JPL numbers itself (just like the original Neon demo).
I’d pay the most attention to the moon counts when you test this.
Astronomers keep confirming new moons, and Saturn alone now has more than 270 of them. A model that relies only on its training data will likely give you an outdated number, so compare the info panel against the NASA Planetary Fact Sheet before you trust it.
3. Animating an image using Three.js (or even 3D)
This is the coolest example on this list. In the past couple of years of using AI agents for many types of use cases, I never thought of this.
You feed an image, and the agent turns it into an animated scene using Three.js. That’s so cool when it works.
In case you’re not familiar with Three.js, it is an open-source JavaScript library used to create and display animated 3D computer graphics directly inside a web browser. It is very lightweight compared to full-featured 3D game engines, which is why it is ideal for browser-based games or animation.
Here’s how it was built:
- Start From One Static JPEG: Everything begins with a single 1376×768 anime frame.
- Local AI Depth & Hidden-Wall Painting: Depth-Anything-V2-Large runs locally on Apple Silicon to separate near from far, while Python cuts out the woman, curtains, and lanterns and paints the hidden wall & brick behind them.
- Smart Pixel Stencils Lock Every Effect: Seven automated region masks tell the GPU exactly where rain belongs, where puddles ripple, which neon signs glow, and where the indoor ramen counter stays completely dry.
- Live 60 fps Shaders, Tactile Physics & Audio: Eleven custom WebGL2 shaders animate her breathing, blinking, hair sway, steam, and GPU water waves. Plus, you can brush the curtains, spark neon signs, splash puddles, and drag a live Before/After comparison curtain.
This is what each phase looks like:
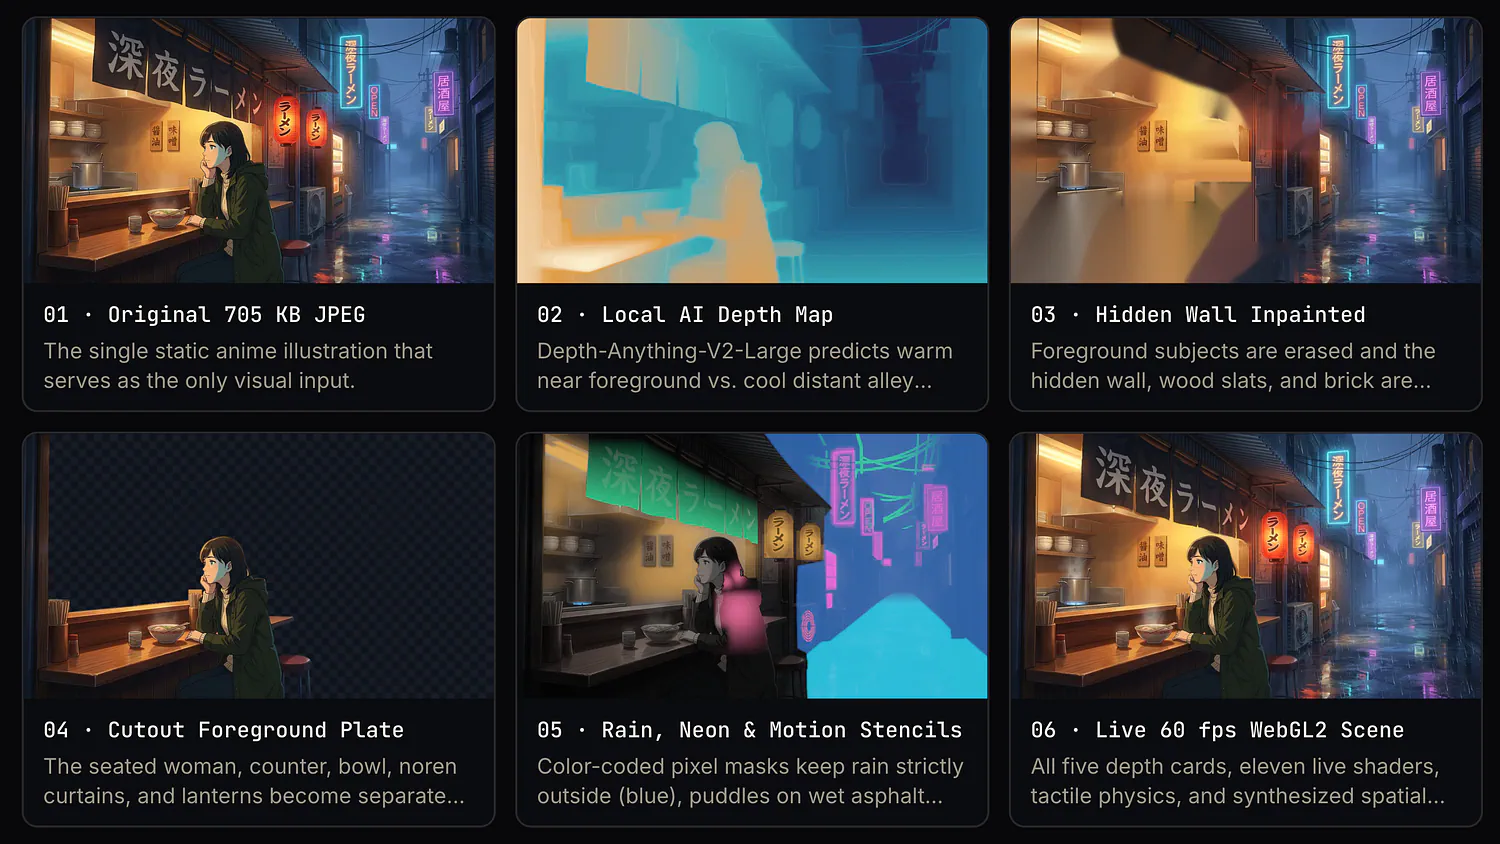
The creator calls it a 2.5D diorama, and that’s an accurate name for it.
It isn’t a full 3D scene. The image is cut into five flat layers placed at different depths, so when you move your mouse, the nearer layers shift more than the farther ones and your eyes read it as depth.
What’s interesting here is how little is going on under the hood.
The whole scene starts from a 705 KB JPEG. According to the creator, it runs at 60 fps on an Apple M5 Max with only 19 draw calls and 57,792 triangles, which is very light for something that looks this alive. Even the audio is generated on the fly.
The rain, the thunder, the simmering broth, and the hum of the neon signs are all produced by code using the Web Audio API, with no audio files involved.
To be fair to the other models, Neon didn’t do everything here. The depth map came from a separate open-source model, Depth-Anything-V2. Neon’s role was to engineer the whole pipeline and write the shaders that connect all the pieces, which is still a lot of work for a single agent.
The X user who created the demo published the detailed workflow of how he made this. Check it out below:
Shinya RamenSpeaking of 3D, Google CEO Sundar Pichai also shared a demo of a 3D-rendered video using Neon + Blender MCP.
The video is a photorealistic lab simulation made in Antigravity, Google’s agentic coding tool. Blender MCP is a connector that lets an AI agent control Blender directly, so the agent can build and render the scene without a person clicking through the software.