
AI video models have gotten ridiculously good over the past few months. Seedance 2.5, Kling 3.0, Runway V4, and a few others can now handle believable movement, dialogue, camera work, and sound in the same clip.
Yes, these models aren’t gonna replace a real human film crew anytime soon. They aren’t perfect, but they are already good enough for someone with a laptop and an internet connection to make a short drama.
The problems usually appear after the first clip. Mina may look great in the opening scene, then suddenly have a different face, jacket, and hairstyle five seconds later. The station can also change completely between camera angles. Put six or seven clips together, and those small differences become painfully obvious.
I wanted to try Artlist here because most of the pieces are under one account. The AI Toolkit handles the images, video, voices, and music. Artlist Studio is where I can put the film together.
For this guide, I’ll use both tools to make a fictional vertical microdrama called The Last Platform. The images and reactions are placeholders for now. I’ll replace them once I generate the real assets.
Let’s get started.
What Is Artlist?
I originally knew Artlist as a stock music site. The company started as a music-licensing platform in 2016, then added sound effects, footage, templates, LUTs, and other assets used in video production.
It looks very different now. The AI Toolkit includes image, video, music, and voice generation, while Artlist Studio is made for longer projects with several connected shots.
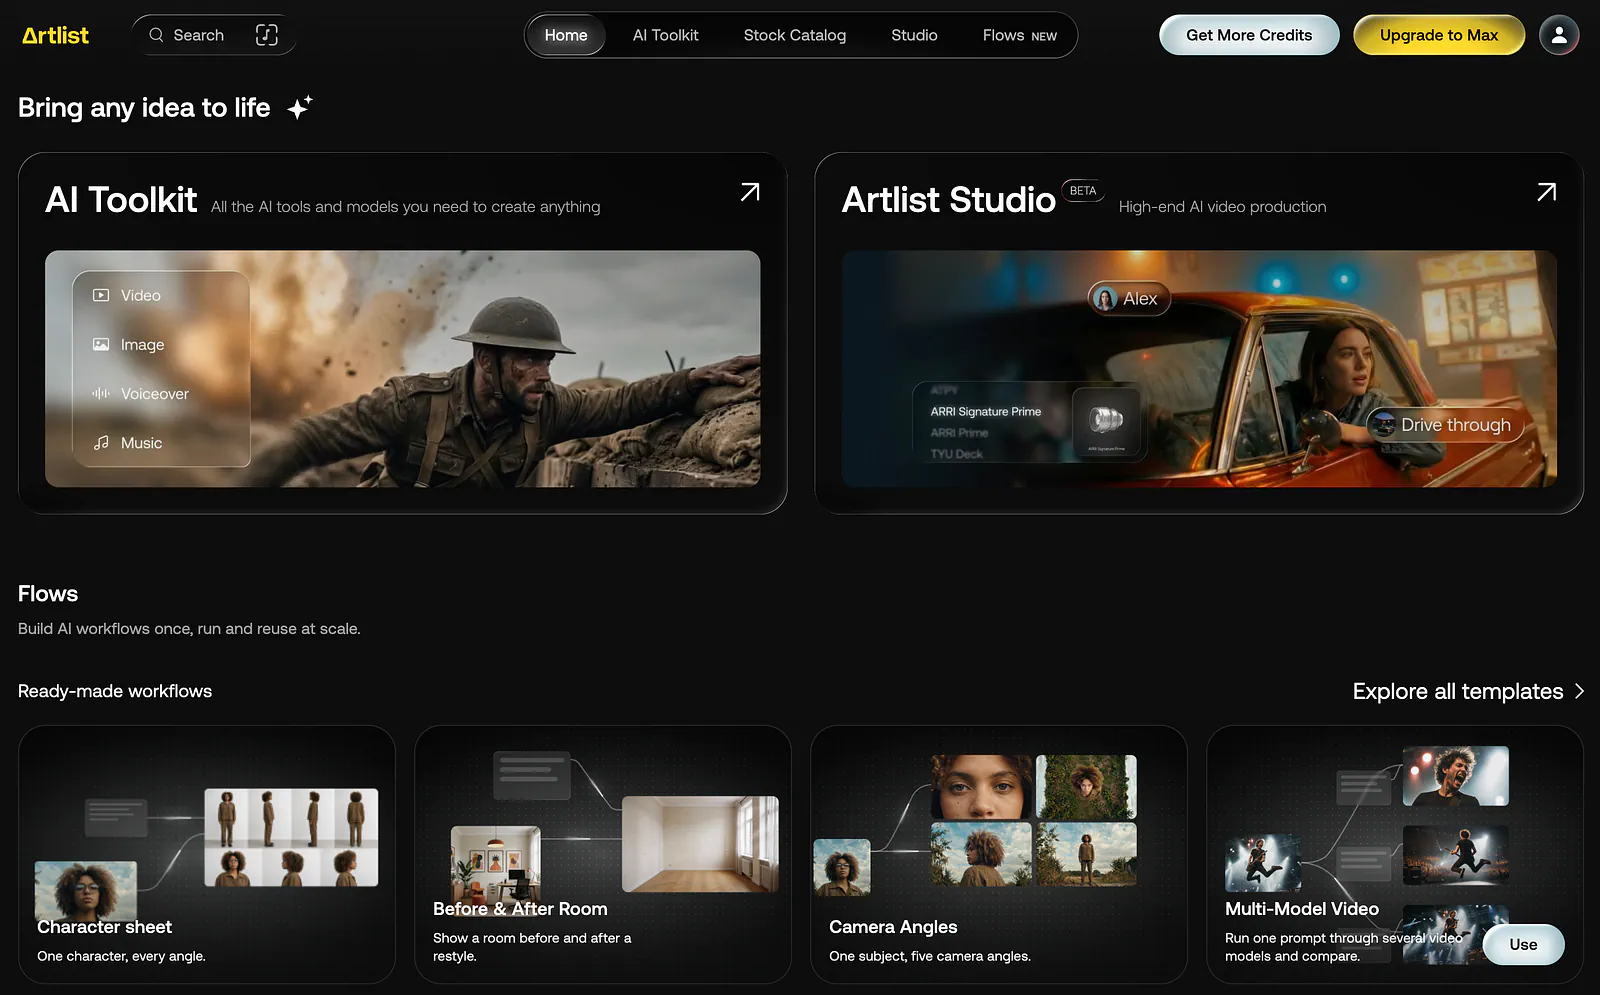
Artlist homepage with AI toolkit and Artlist Studio tools. Image by Jim Clyde Monge
There are also AI Apps for quick effects and Flows for building reusable generation chains.
Artlist also keeps its model catalog updated with the latest releases. At the time of writing, that includes newer models such as Seedance 2.5, Kling 3.0, GPT Image 2, and Nano Banana 2. New model updates are added directly to the Toolkit, so you do not need a separate subscription every time another company releases something I want to try.
Obviously, I’m not gonna use a hundred models to make one tiny film. I just want the freedom to use GPT Image for a character, Seedance for one scene, and perhaps Kling for another.
Start With the Story, Not the Video Model
Before I begin using the image generator, I need to know what actually happens in the story. Skipping to pour in time and effort into writing a good story is one of the biggest mistakes creators make.
So I’d write the plot first, followed by the characters, scenes, dialogue, ending, and a few visual notes. I should be able to explain the whole thing in one sentence. For a short piece like this, two characters and one main location are plenty.
Adding another character on the fly sounds easy, but it’s actually not. You’d need to make a new portrait, view it from several angles, create a voice, and match shots for that person. The same problem comes with every new location. I’d rather spend the time improving two characters people might remember.
I’m using 16:9 because this microdrama is meant for YouTube.
The Sample Microdrama
The Last Platform is a 75-to-90-second science-fiction drama set inside an almost empty metro station at midnight. Mina, a bicycle courier, finds an injured transit engineer named Elias waiting beside the last train. He shows her a photograph taken the following morning. It shows the station destroyed and Mina standing in the wreckage.
Elias tells her not to board. Mina assumes the photograph is a trick until she notices the silver hair clip she is wearing in the image. The train doors open, an announcement calls her name, and she has seconds to decide whether to trust him. She steps away just before the train leaves, and every light in the tunnel goes dark.
This gives me enough material to test Artlist without turning the article into a full movie production. There are two characters, a station and train carriage, plus the photograph and pocket watch. Rain, reflections, moving doors, and the final blackout should keep the visuals from getting boring.
My rough shot plan would look like this:
- Establish the rain-soaked platform and Mina arriving with her courier bag.
- Reveal Elias sitting near the final carriage with an injured forehead.
- Show their conversation and the photograph passing between them.
- Cut to Mina’s close-up as she recognizes her hair clip in the photograph.
- Open the train doors while the station announcement calls Mina by name.
- Let the train leave without her, followed by the tunnel blackout.
For the demo that I’m gonna share in this post, I’m stopping at six shots. Alright, now it’s time to get to work.
Use the AI Toolkit to Prepare the Assets
I’d start in the AI Toolkit and prepare the assets I know the story needs: Mina, Elias, the station, the train interior, the photograph, and a brass transit watch. I’d also make a few rough storyboard images before spending more credits on video.
The prompt box changes depending on what I’m making. Choosing Image brings up the image models and their settings, while Video shows controls for duration, resolution, references, and audio. I do not have to dig through a giant settings panel every time I switch models.
I’d begin with one image showing the general look of the film. Think of it as a mood board squeezed into a single frame. I mainly want to settle the colors, lighting, and how futuristic the station should feel.
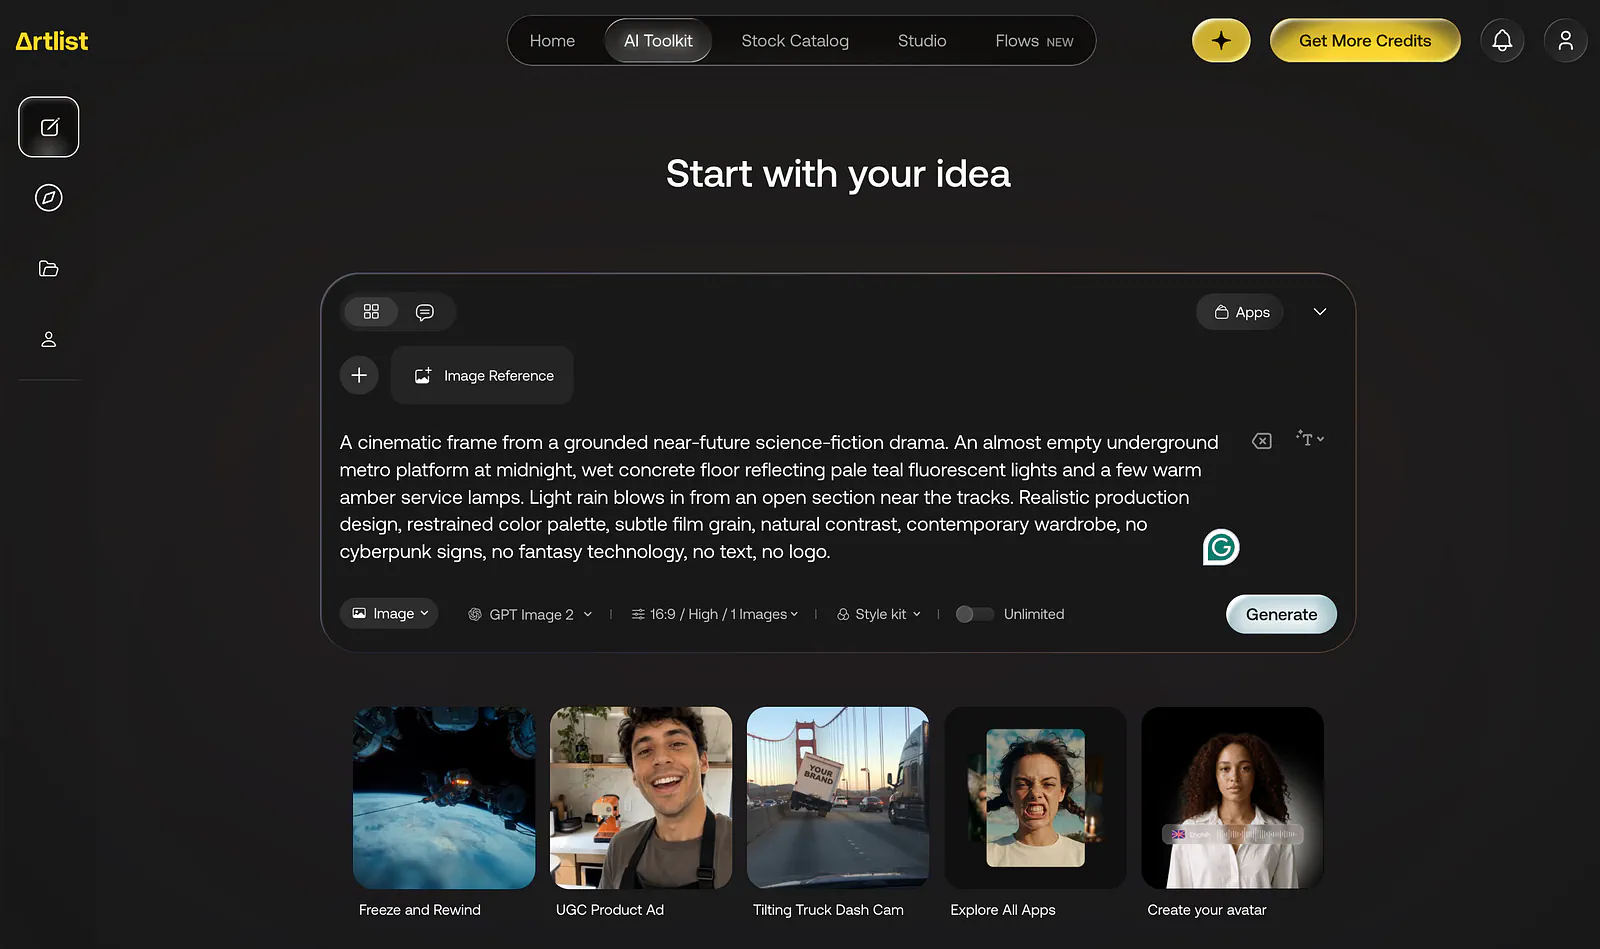
Image generation on Artlist. Image by Jim Clyde Monge
Prompt: A cinematic frame from a grounded near-future science-fiction drama. An almost empty underground metro platform at midnight, wet concrete floor reflecting pale teal fluorescent lights and a few warm amber service lamps. Light rain blows in from an open section near the tracks. Realistic production design, restrained color palette, subtle film grain, natural contrast, contemporary wardrobe, no cyberpunk signs, no fantasy technology, no text, no logo.
For this pass, I’d use GPT Image 2 or Nano Banana 2. GPT Image 2 is useful for detailed prompts and complicated compositions. Nano Banana 2 is faster when I need several related frames and want to feed the model more references.
Here’s the output:
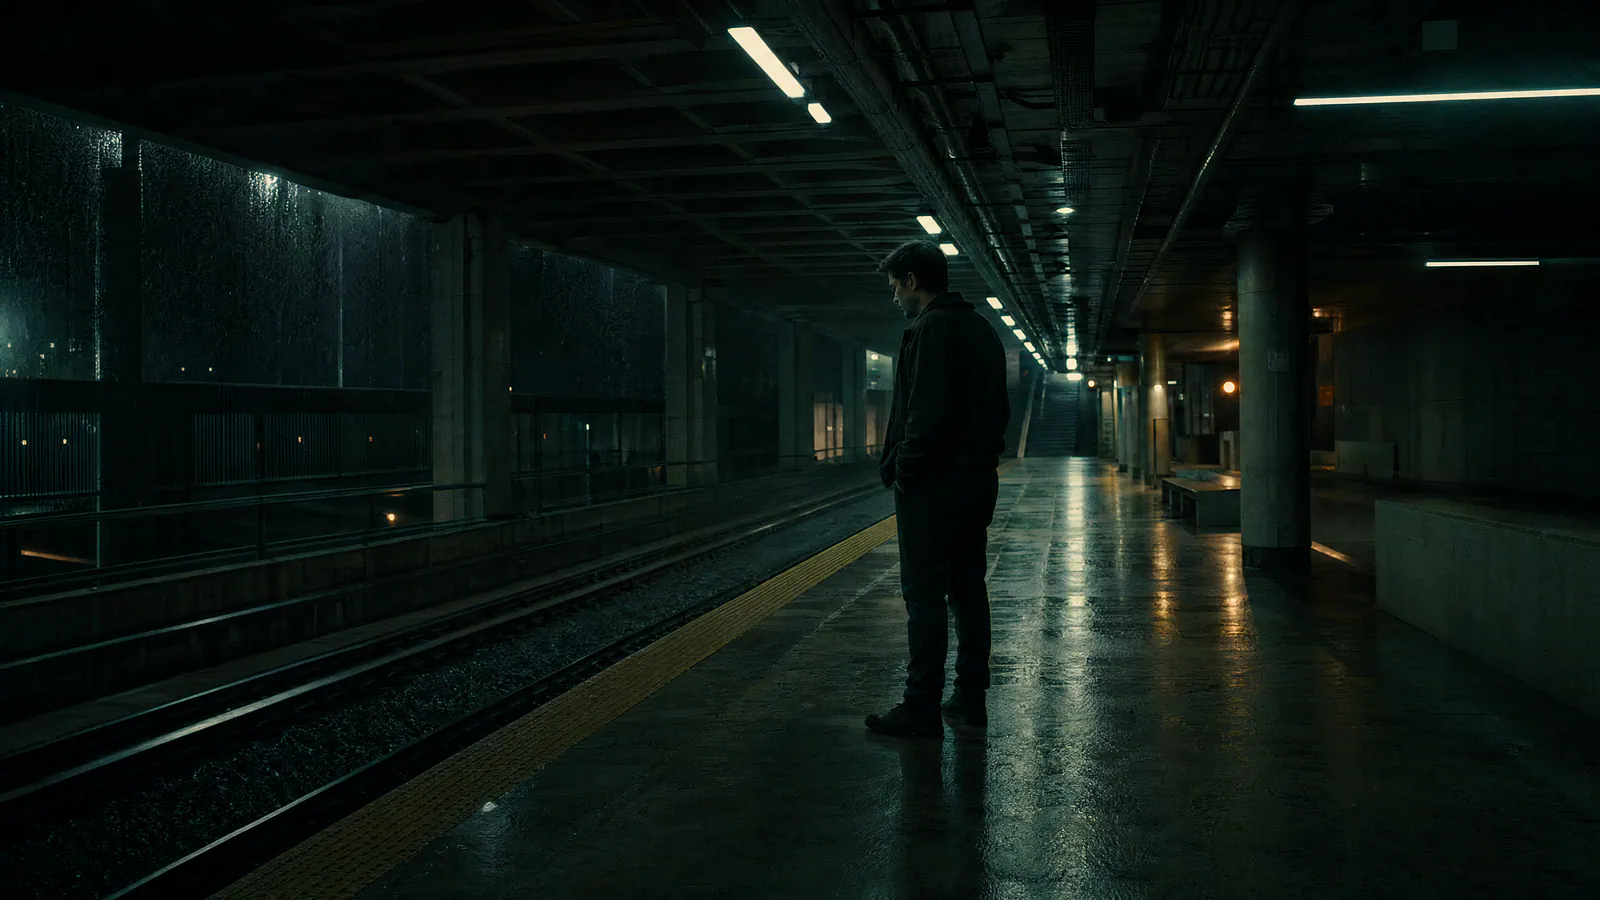
Scene environment generation example with Artlist. Image by Jim Clyde Monge
Awesome! I love the ambiance of the scene. It’s a little too dark, but the story needs that kind of aura anyway, so I’ll stick with it. The details on the wet floor and the reflections coming from the lights make the station look super realistic.
Generate Mina and Elias
One thing to know about the Characters feature is that it needs a source image. I’ll generate a clean portrait, open it from My Library, and select Use as character. Artlist then saves the likeness for later generations.
Mina and Elias will appear as named references inside the prompt box, and supported models let me tag them with @. That saves me from pasting the same physical description into six prompts. From experience, a written description alone is nowhere near enough to keep a face consistent.
Portrait prompt for Mina
Prompt: A 28-year-old Southeast Asian woman with an athletic build, oval face, dark brown eyes, and shoulder-length black hair tied into a low practical ponytail. She wears a charcoal waterproof courier jacket with a muted red lining, a black cross-body delivery bag, and one distinctive silver crescent hair clip above her left temple. Calm but alert expression. Front-facing, chest-up, neutral gray studio background, soft even lighting, realistic skin texture, grounded cinematic realism, no text, no logo.
Portrait prompt for Elias
Prompt: A 34-year-old man with a lean build, tired hazel eyes, short wavy dark hair, and light stubble. He wears a navy transit maintenance jacket over a pale gray shirt, with a small stitched rail emblem and a worn brass pocket watch chain. A shallow bandage sits above his right eyebrow. Reserved, urgent expression. Front-facing, chest-up, neutral gray studio background, soft even lighting, realistic skin texture, grounded cinematic realism, no text, no logo.
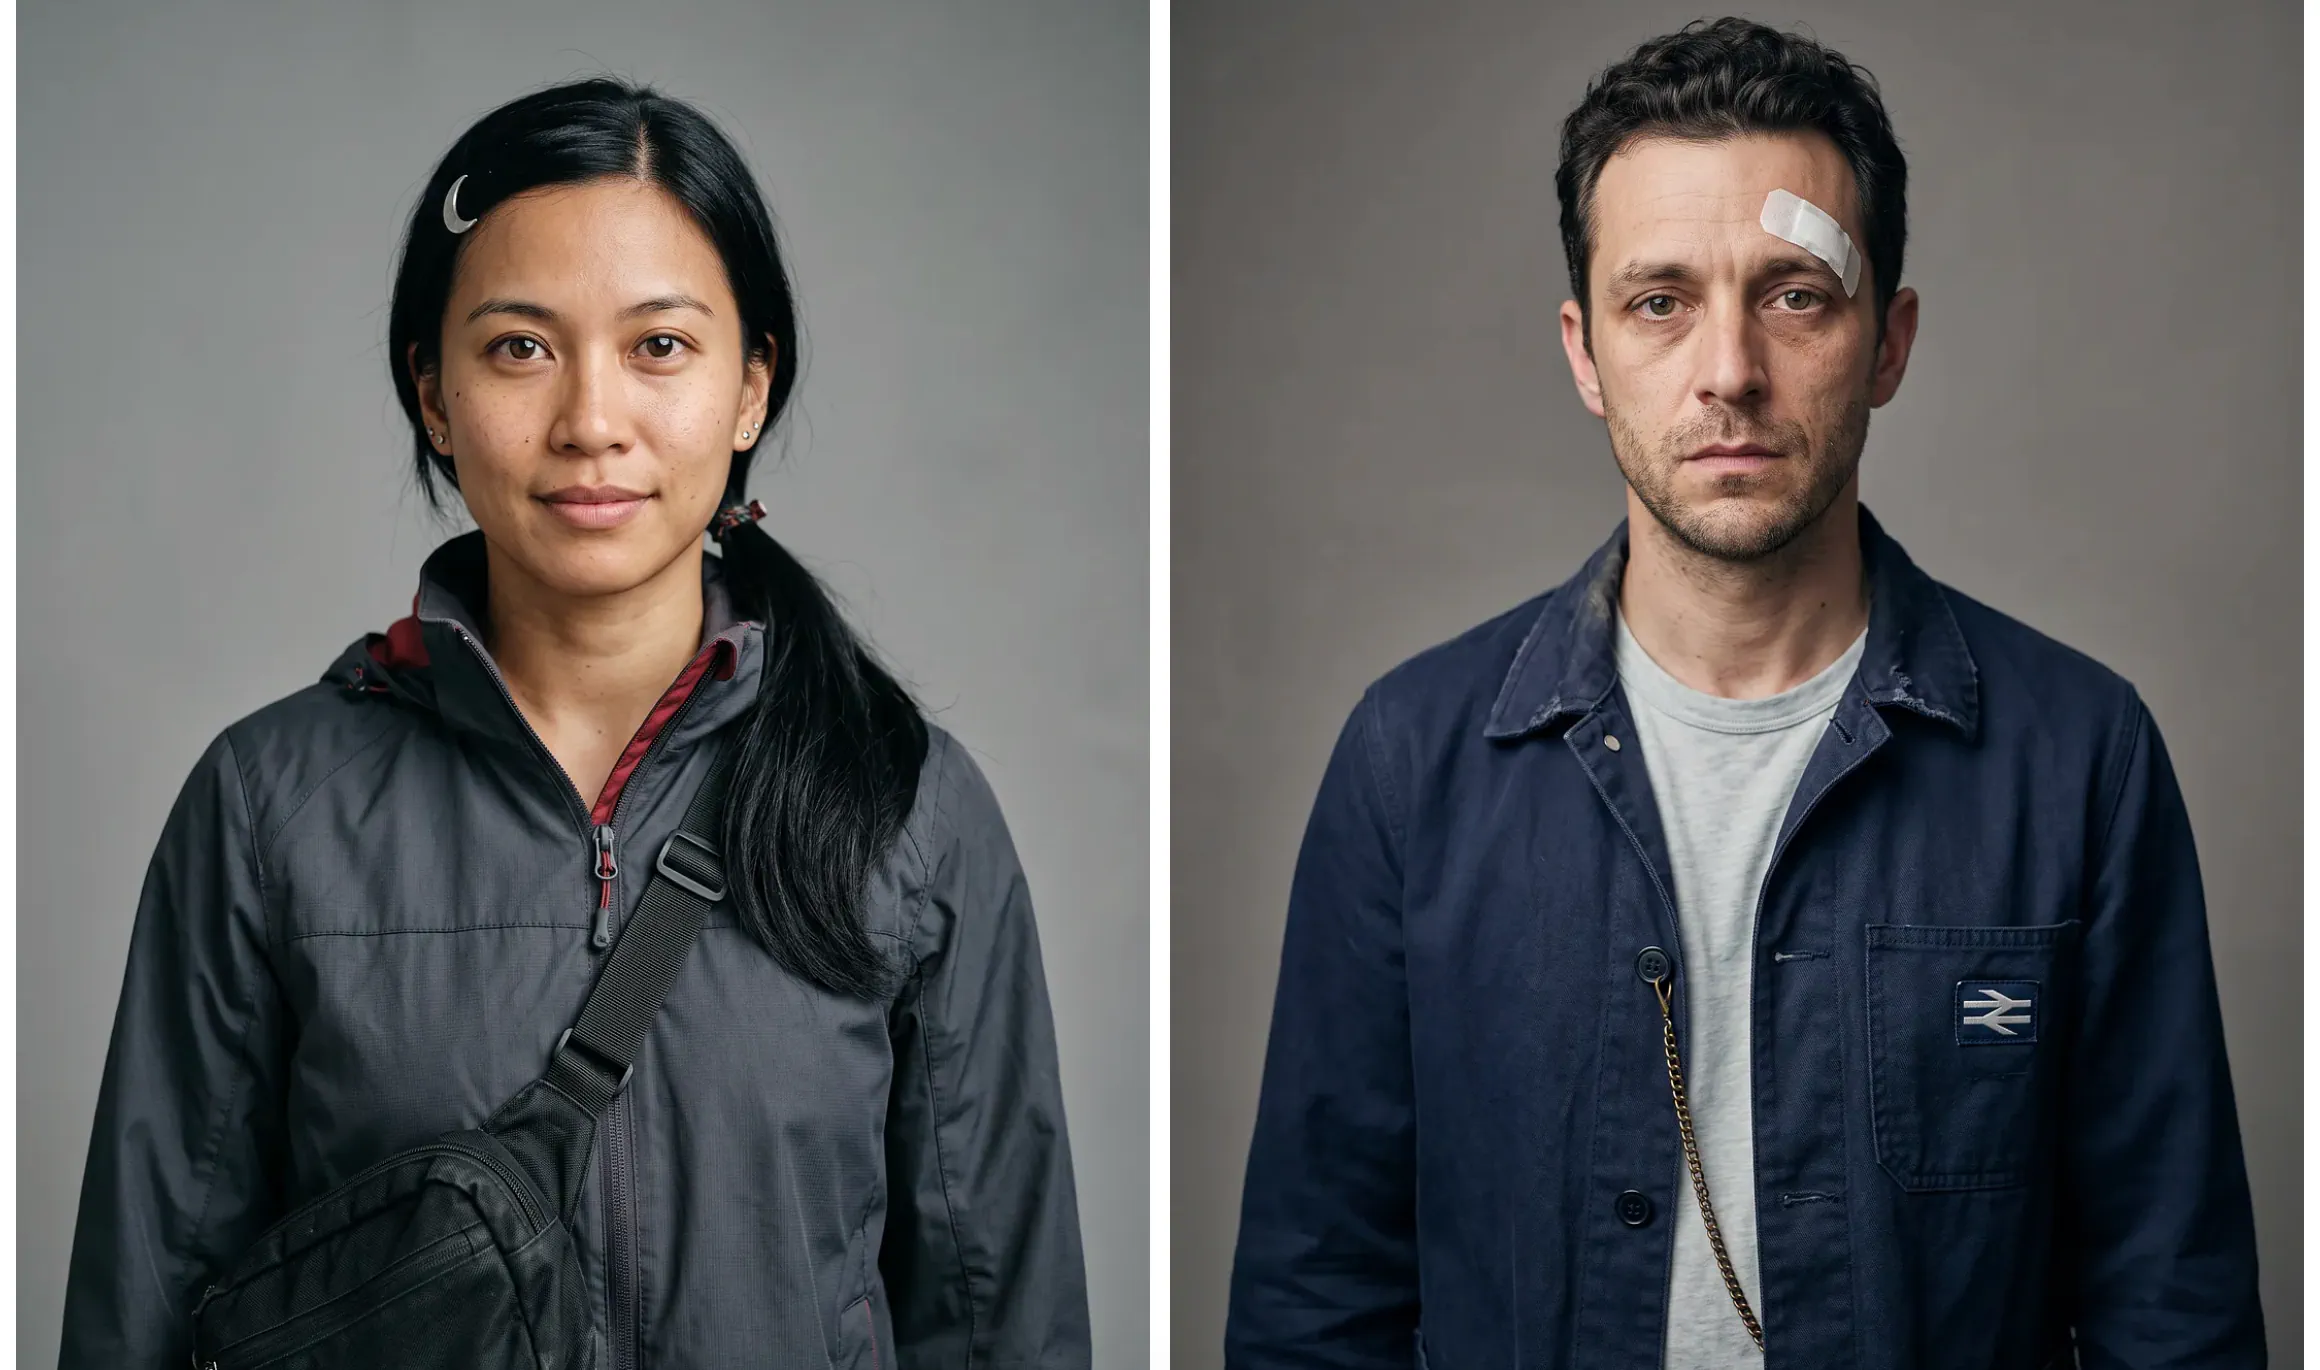
Sample characters: Mina and Elias. Images generated by Jim Clyde Monge
I gave each character a detail that should remain visible in close-ups. Mina has the silver hair clip, while Elias has the bandage and watch chain. The model will probably move the clip to the wrong side at some point. I’ll regenerate that image because the clip is part of the reveal, not random decoration.
The saved portrait will be clear, front-facing, and honestly a bit boring. That gives Artlist a clean view of the face. The dramatic lighting can come later when I generate the actual scenes.
Now, create new characters from these portrait photos by going to the Characters tab. Make sure to set the correct gender and give it a proper name.
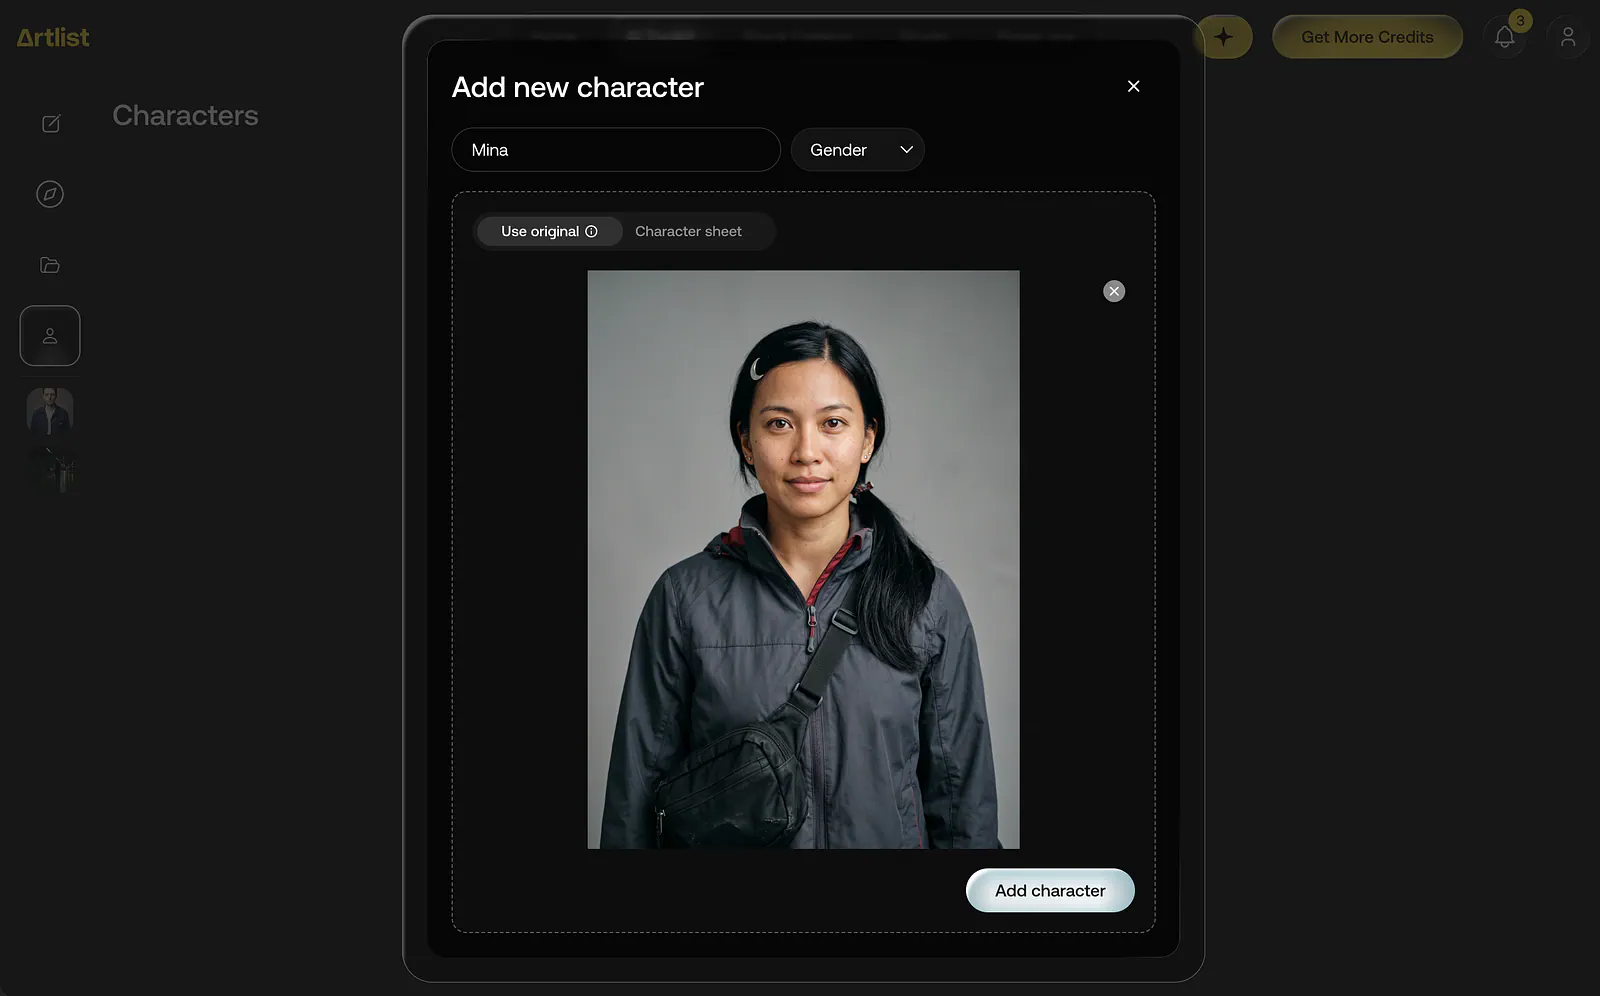
Sample character: Mina. Image generated by Jim Clyde Monge
Alright, the characters are ready. It’s time to build the environment.
Build the Locations and Props
Next comes the station. I’d generate a wide view, a medium view beside the last carriage, a closer view of the train doors, and a reverse angle facing the tunnel. The style image stays attached as a reference so I’m not relying on the model to remember the colors from text.
Your image generator dashboard should look like this:
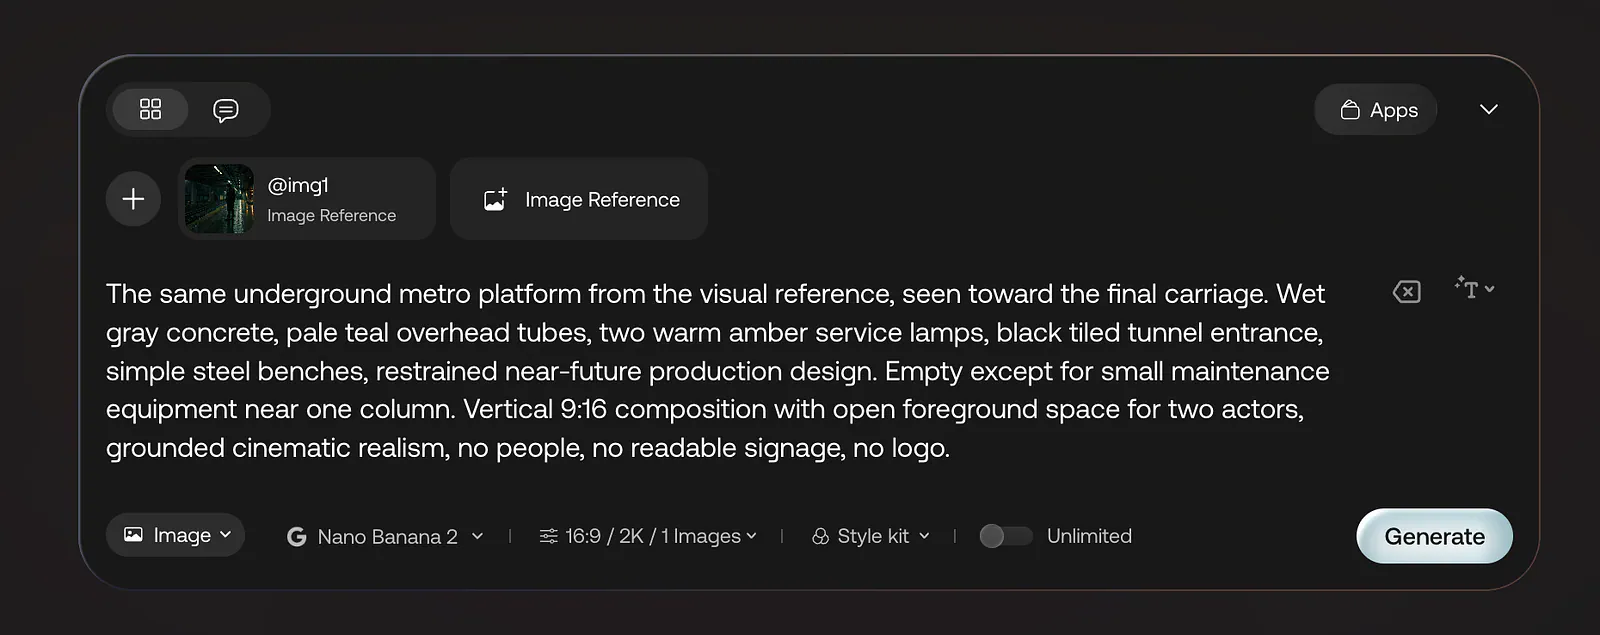
Using Artlist’s image generator with reference example. Image generated by Jim Clyde Monge
Here’s the prompt:
Prompt: The same underground metro platform from the visual reference, seen toward the final carriage. Wet gray concrete, pale teal overhead tubes, two warm amber service lamps, black tiled tunnel entrance, simple steel benches, restrained near-future production design. Empty except for small maintenance equipment near one column. Vertical 9:16 composition with open foreground space for two actors, grounded cinematic realism, no people, no readable signage, no logo.
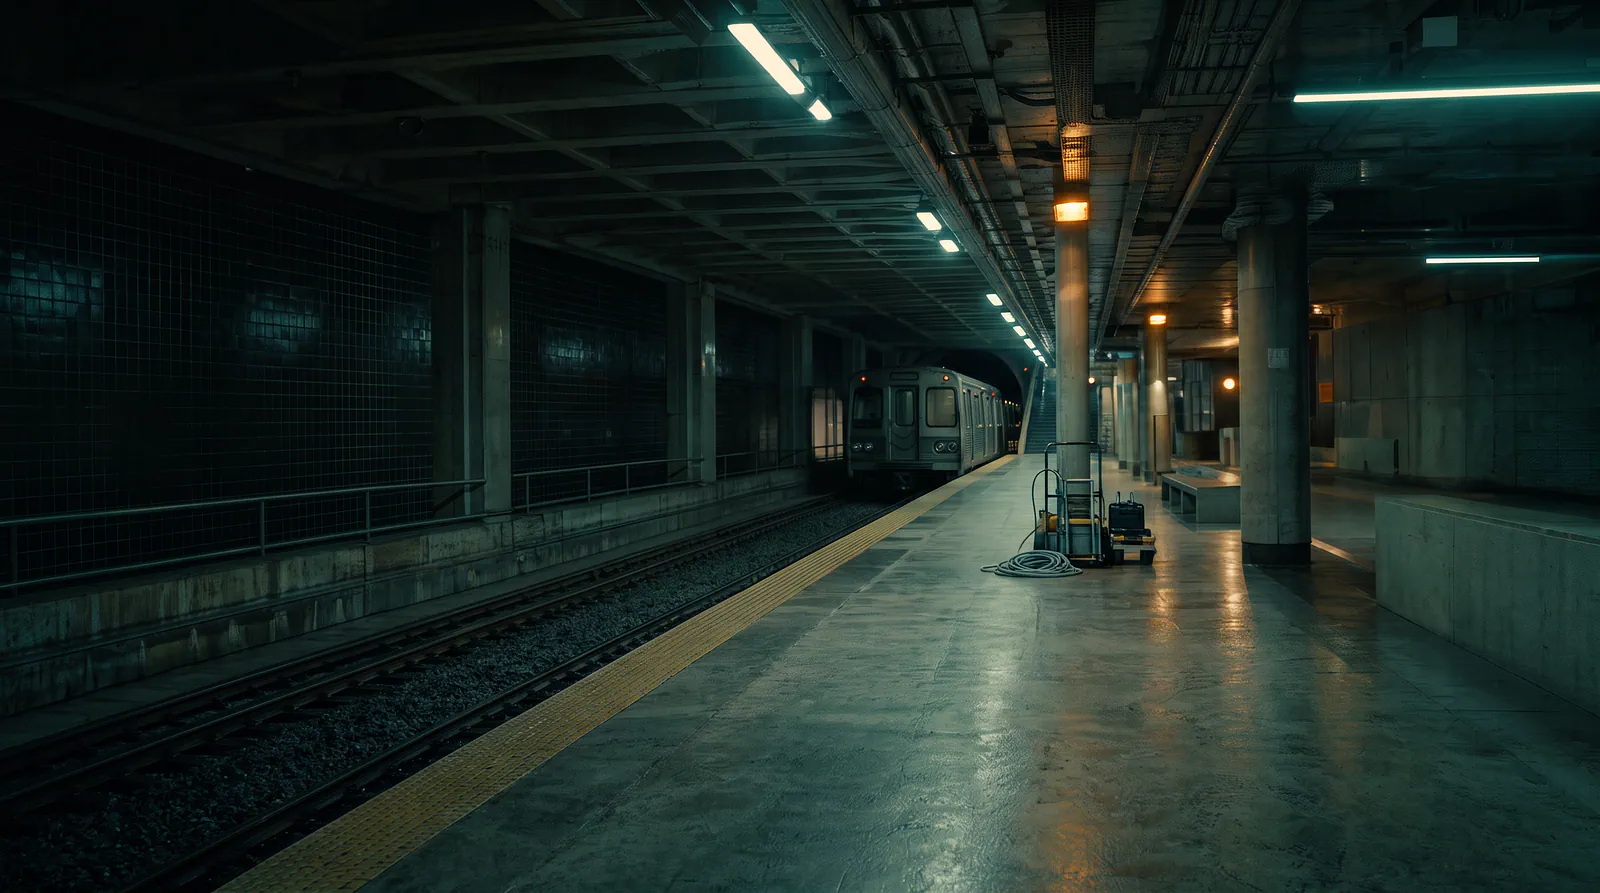
Sample environment image generation on Artlist. Image generated by Jim Clyde Monge
Leaving it entirely to the video model would probably give Elias a blurry card with nonsense printed on it. The pocket watch gets a separate reference as well, since small objects often turn into mush once hands start moving.
Prompt for the prop:
Prompt: Close-up evidence photograph printed on slightly bent instant-film paper. The image shows the same metro platform after a destructive electrical accident at dawn, broken ceiling panels, smoke, emergency lights, and Mina standing safely near the edge of the frame. Her silver crescent hair clip is clearly visible. Realistic damaged photograph texture, held against a neutral dark surface, no caption, no watermark.
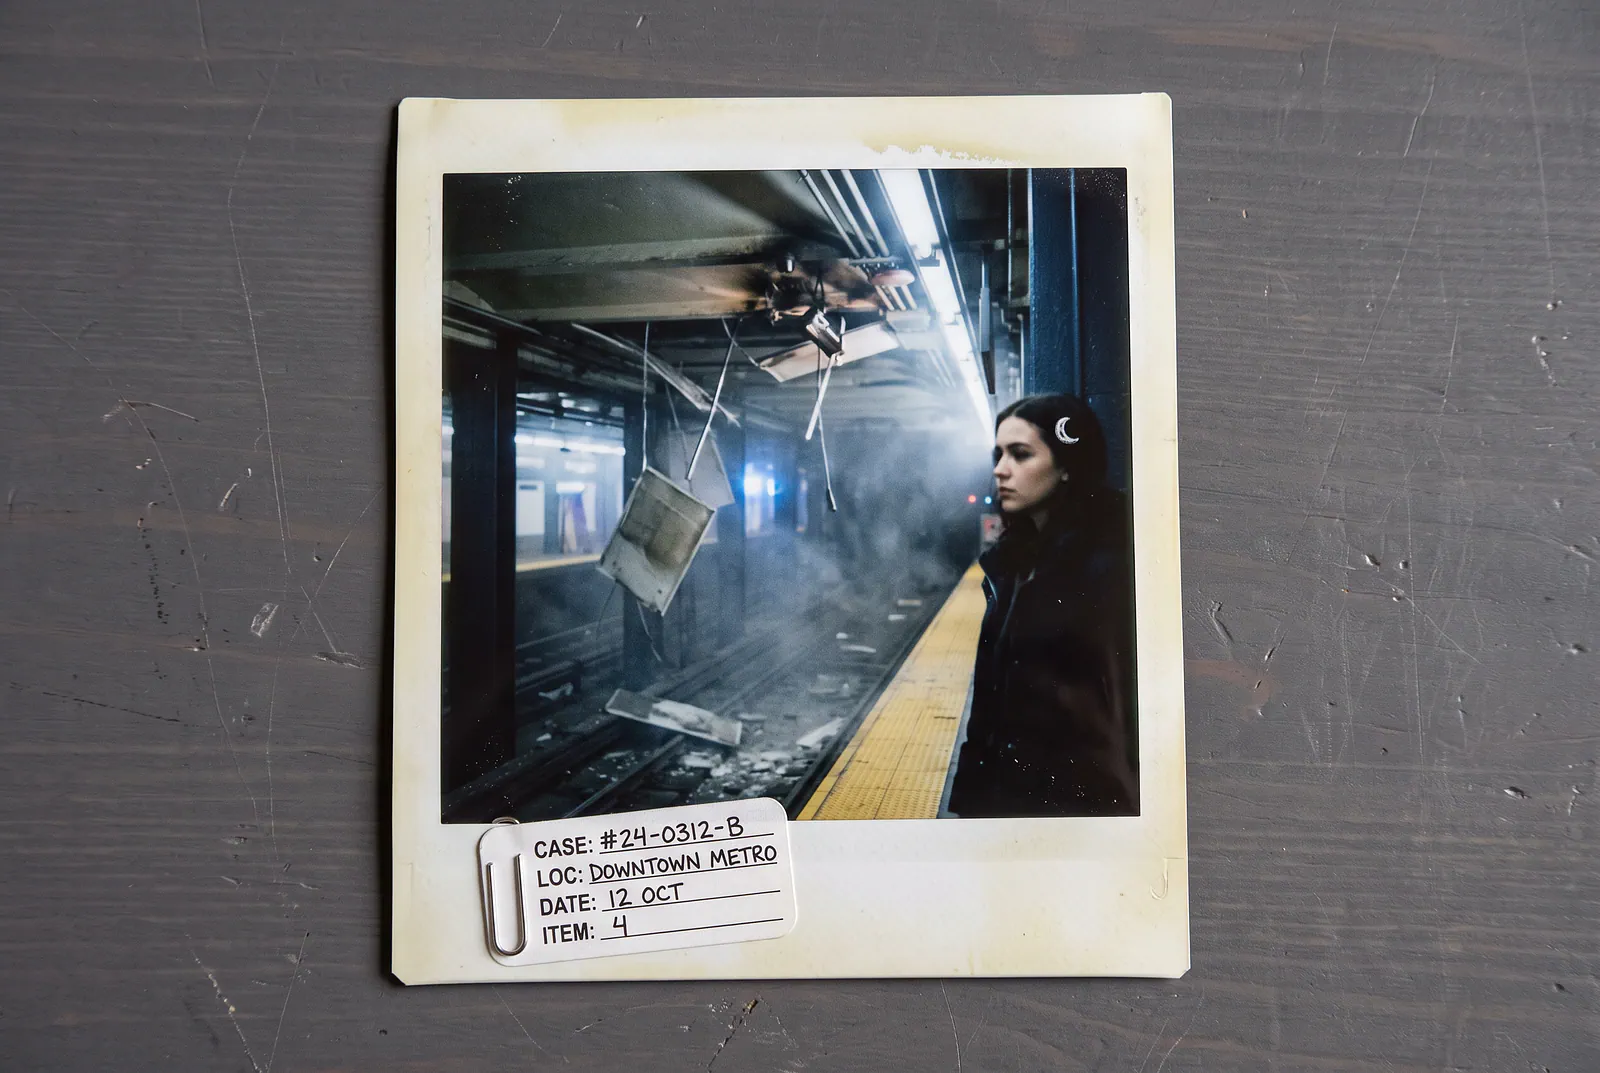
Sample props image generation on Artlist. Image generated by Jim Clyde Monge
I’d save the main reference as a Style Kit too. A Style Kit can hold reference images, colors, and written instructions, then apply them to supported Toolkit and Studio generations. Mine would contain the teal, amber, charcoal, and muted-red palette with a short note asking for grounded near-future realism.
The Explore tab is useful on days when I have no clear direction. I can find an image with lighting or composition I like, inspect how it was made, and remix the prompt. I still need to make it fit the story instead of copying a random aesthetic because it looks cool.
Prepare Dialogue, Voice, and Music
I’d record myself reading the dialogue before generating any voices. The recording can sound terrible. I only need the timing, especially the pause after Elias gives his warning and the moment Mina looks down at the photograph.
Artlist has text-to-speech, speech-to-speech, and custom voices. Speech-to-speech makes the most sense here because I can keep my timing and change how the speaker sounds. Voice cloning is available too, although I need permission from whoever owns the voice.
The dialogue can remain short:
Elias: “If you board that train, the station does not make it to morning.”
Mina: “How do you know my name?”
Station announcement: “Passenger Mina Reyes, the final train is waiting.”
I do not want dramatic music blasting through the whole thing. A low electronic pulse, distant rail vibration, and a short rise when Mina sees the photograph should be enough. Any weak train sounds can be replaced with something from Artlist’s SFX catalog.
If you don’t want to bother doing all these recordings or audio generation with AI, you can actually just leave it to Seedance 2.5 to overlay the dialogue on the video. Let me show you later on.
Move the Project Into Artlist Studio
With the assets ready, I can open Studio and create a 16:9 project. Scenes sits on the left, while the timeline is on the right. I frame and generate a shot in Scenes, then add the version I want to the timeline.
This is what the project dashboard looks like:
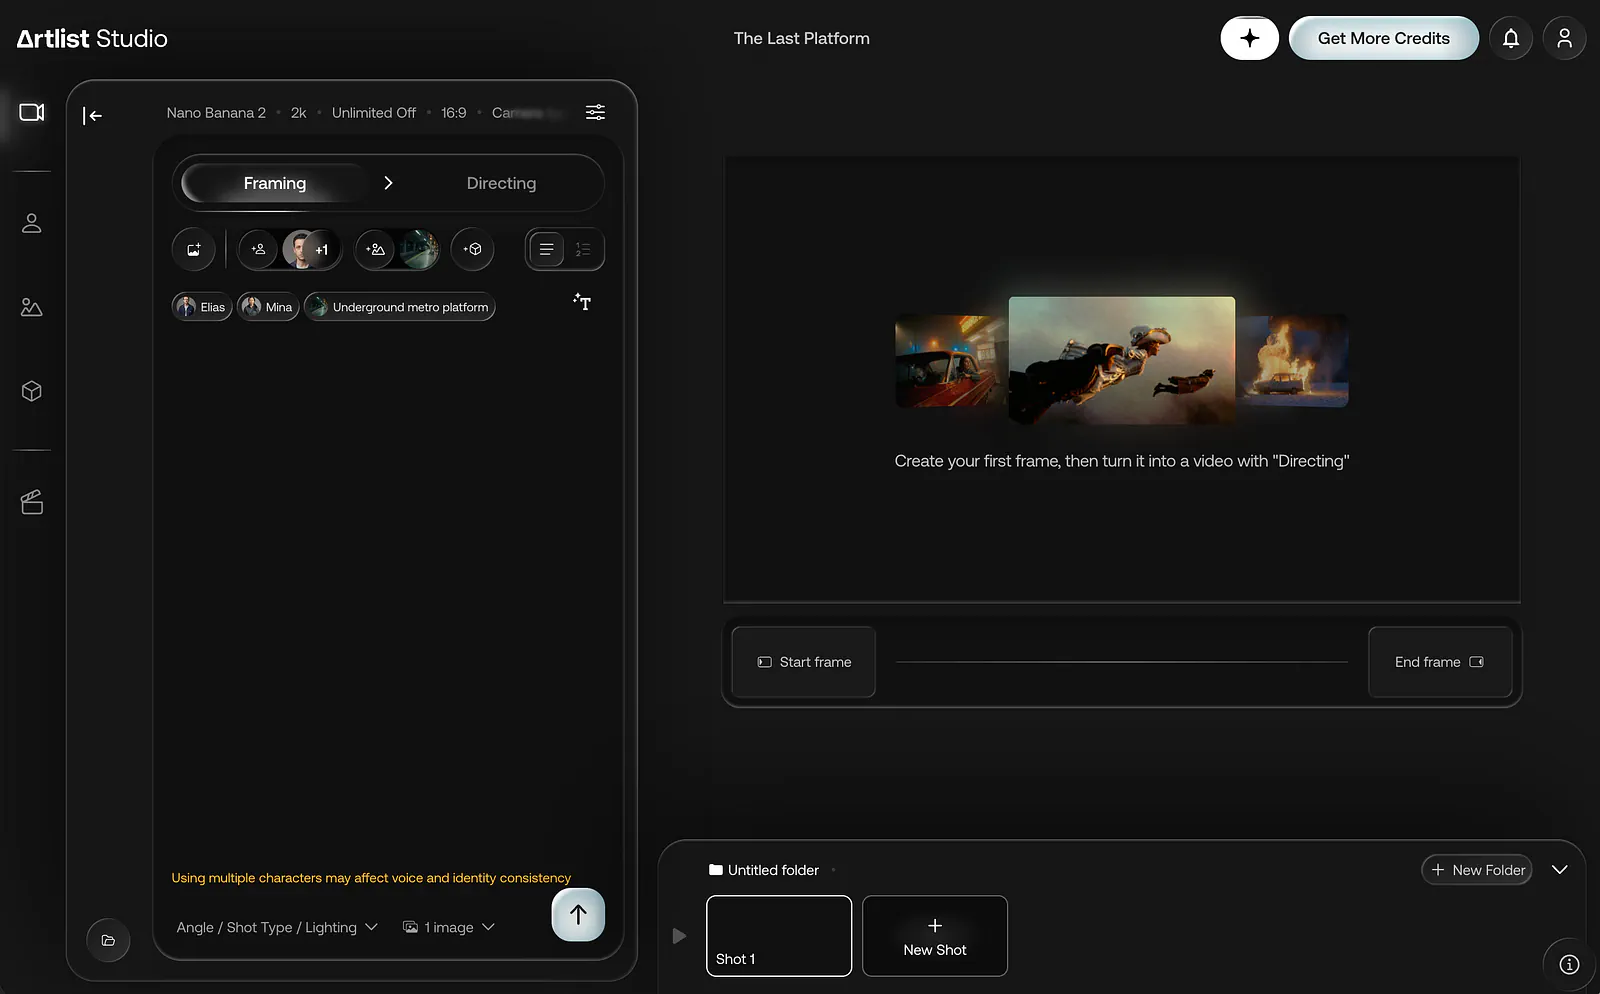
Framing on Artlist’s Studio. Image by Jim Clyde Monge
I could also have created the characters, locations, and props directly in Studio. Its character and location tools can generate several angles, giving Artlist a front, side, back, and three-quarter view to work with.
I’ll use that option for Mina and Elias because one portrait feels a bit thin for characters appearing in almost every scene.
Frame Before Directing
I’d create a still frame before turning each scene into video. Studio has normal free-form prompting, but it can also split the prompt into subject, location, action, composition, style, and mood. There are separate controls for the shot type, angle, lighting, camera, and lens.
Breaking those controls out makes the prompt easier to read. I can work on Mina’s position and the camera angle without mixing in the dolly movement, dialogue, and sound at the same time.
Here’s an example generating the first frame of every scene. Make sure to tag the correct reference image in the prompt. Do this to all the scenes in your film.
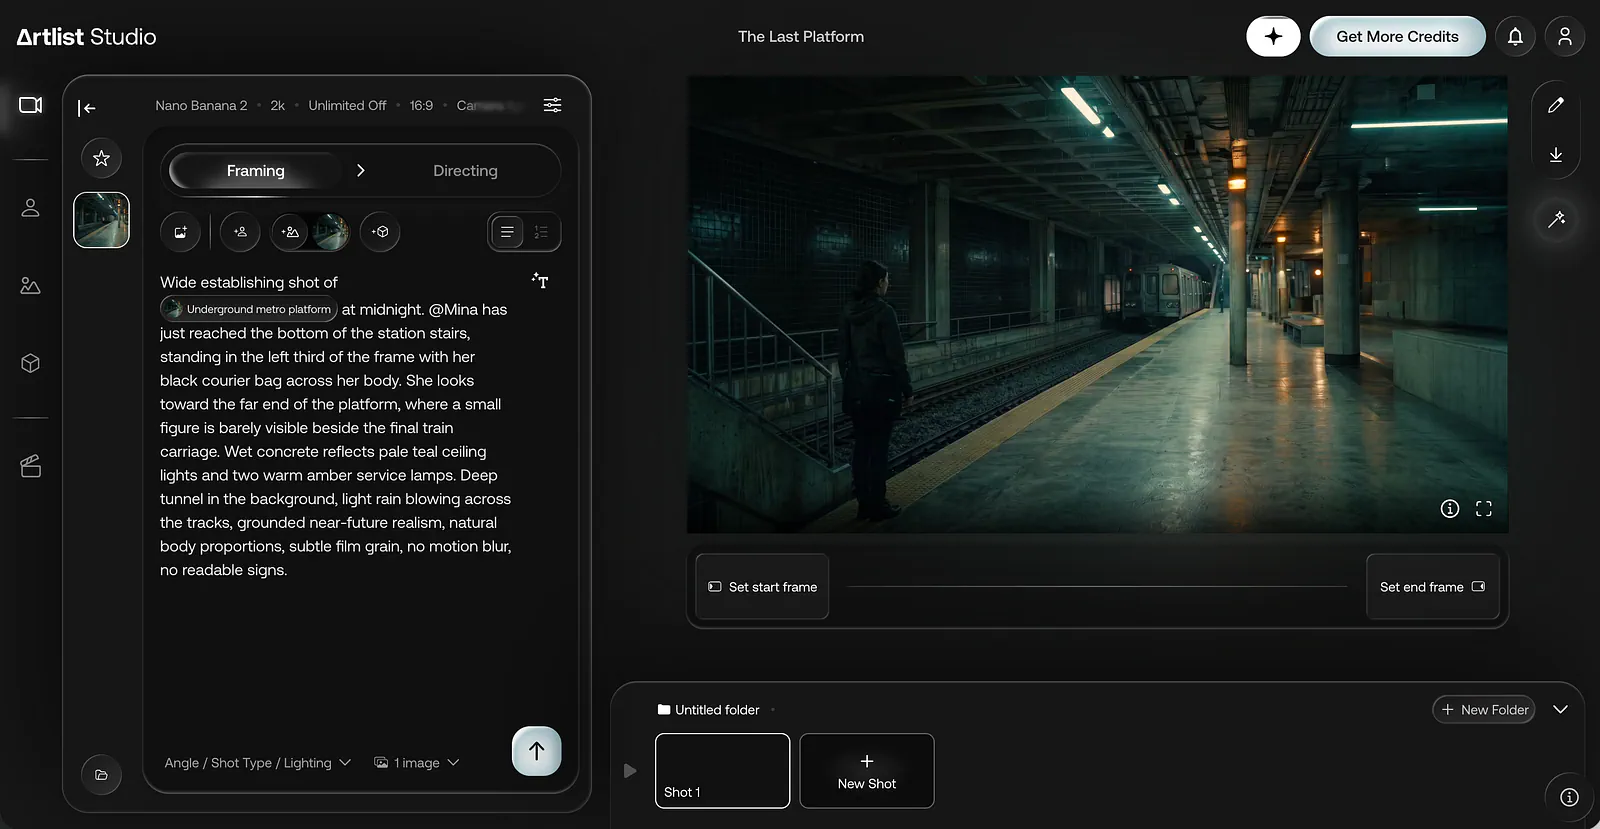
Framing on Artlist’s Studio. Image by Jim Clyde Monge
Every Studio shot needs a start frame. The end frame is optional. I’d use both for something precise, such as the train doors closing, but Mina’s close-up probably only needs a strong start frame and a simple directing prompt.
For all six frames, I’m keeping the project in 9:16 and using the same teal-and-amber color palette. I’d also stick with the ARRI Alexa 35 and Cooke S4/i lens settings throughout the film. Changing cameras and lenses in every scene could make the shots look like they came from completely different productions.
I’ll save the station location as @undergroundmetroplatform so I can tag it alongside Mina and Elias.
Scene 1 frame prompt
Prompt: Wide establishing shot of @undergroundmetroplatform at midnight. @Mina has just reached the bottom of the station stairs, standing in the left third of the frame with her black courier bag across her body. She looks toward the far end of the platform, where a small figure is barely visible beside the final train carriage. Wet concrete reflects pale teal ceiling lights and two warm amber service lamps. Deep tunnel in the background, light rain blowing across the tracks, grounded near-future realism, natural body proportions, subtle film grain, no motion blur, no readable signs.
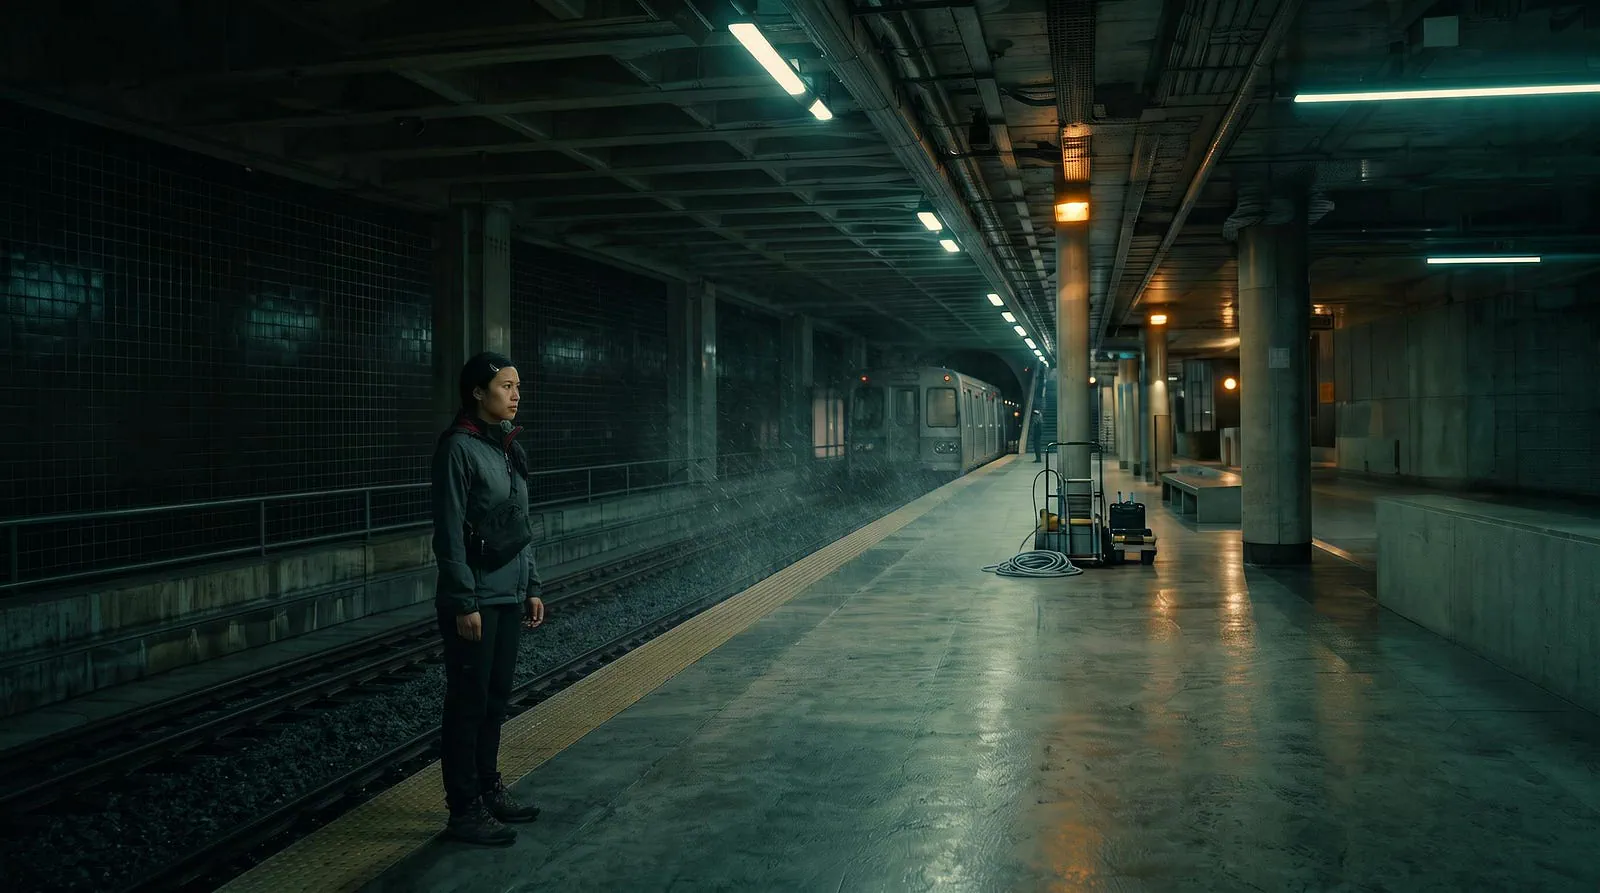
Scene generation example on Artlist’s Studio. Image by Jim Clyde Monge
This frame introduces Mina, the station, and the distance between her and Elias. I want Elias to be visible, though still small enough that the next shot feels like a proper reveal.
Scene 2 frame prompt
Prompt: Medium shot of @Elias sitting on a steel bench at @undergroundmetroplatform beneath a warm amber service lamp. He leans slightly forward with a bent photograph held near his lap. His forehead bandage and brass watch chain are visible. @Mina’s shoulder and courier jacket appear softly out of focus along the right edge of the foreground. Elias is looking down at the photograph before raising his eyes toward her. The final train remains still behind him, restrained teal-and-amber lighting, shallow depth of field, natural expression, no motion blur.
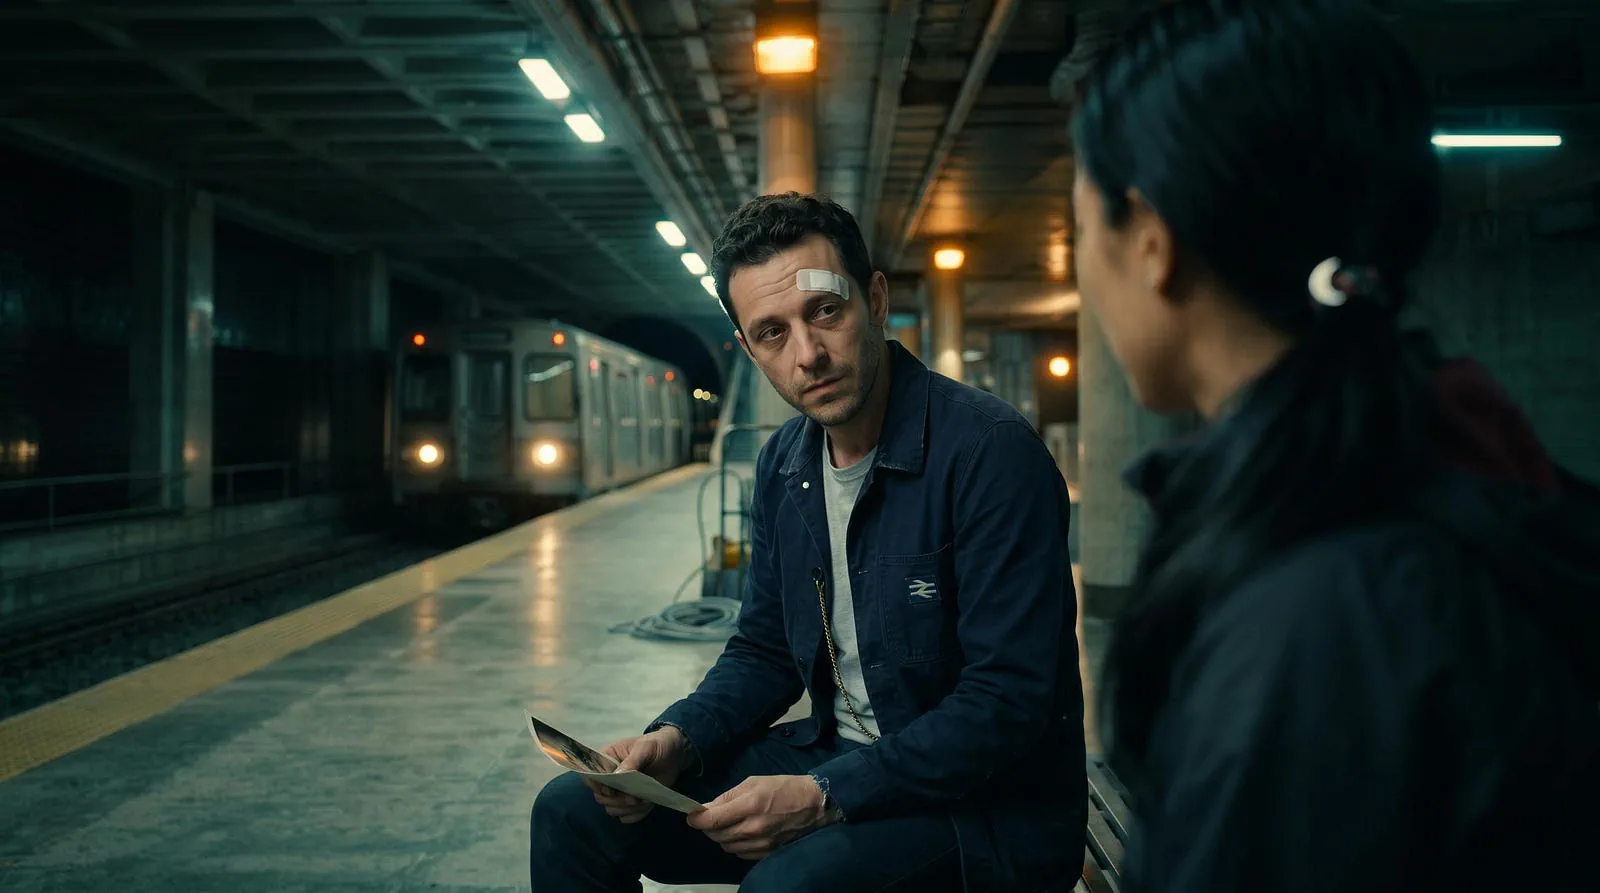
Scene generation example on Artlist’s Studio. Image by Jim Clyde Monge
I’m including a small part of Mina in the foreground so the scene feels like a conversation rather than another isolated portrait of Elias.
Scene 3 frame prompt
Prompt: Over-the-shoulder shot from behind @Mina at @undergroundmetroplatform. Her shoulder and low ponytail frame the left side of the image. @Elias sits opposite her, holding the bent photograph between his fingers near his chest, about to offer it to her. Both of their hands are clearly visible and separated. Focus on Elias and the photograph, with the train and station lights softly blurred in the background. Warm service light on Elias’s face, cool teal light around Mina, realistic hands, natural finger positions, no motion blur.
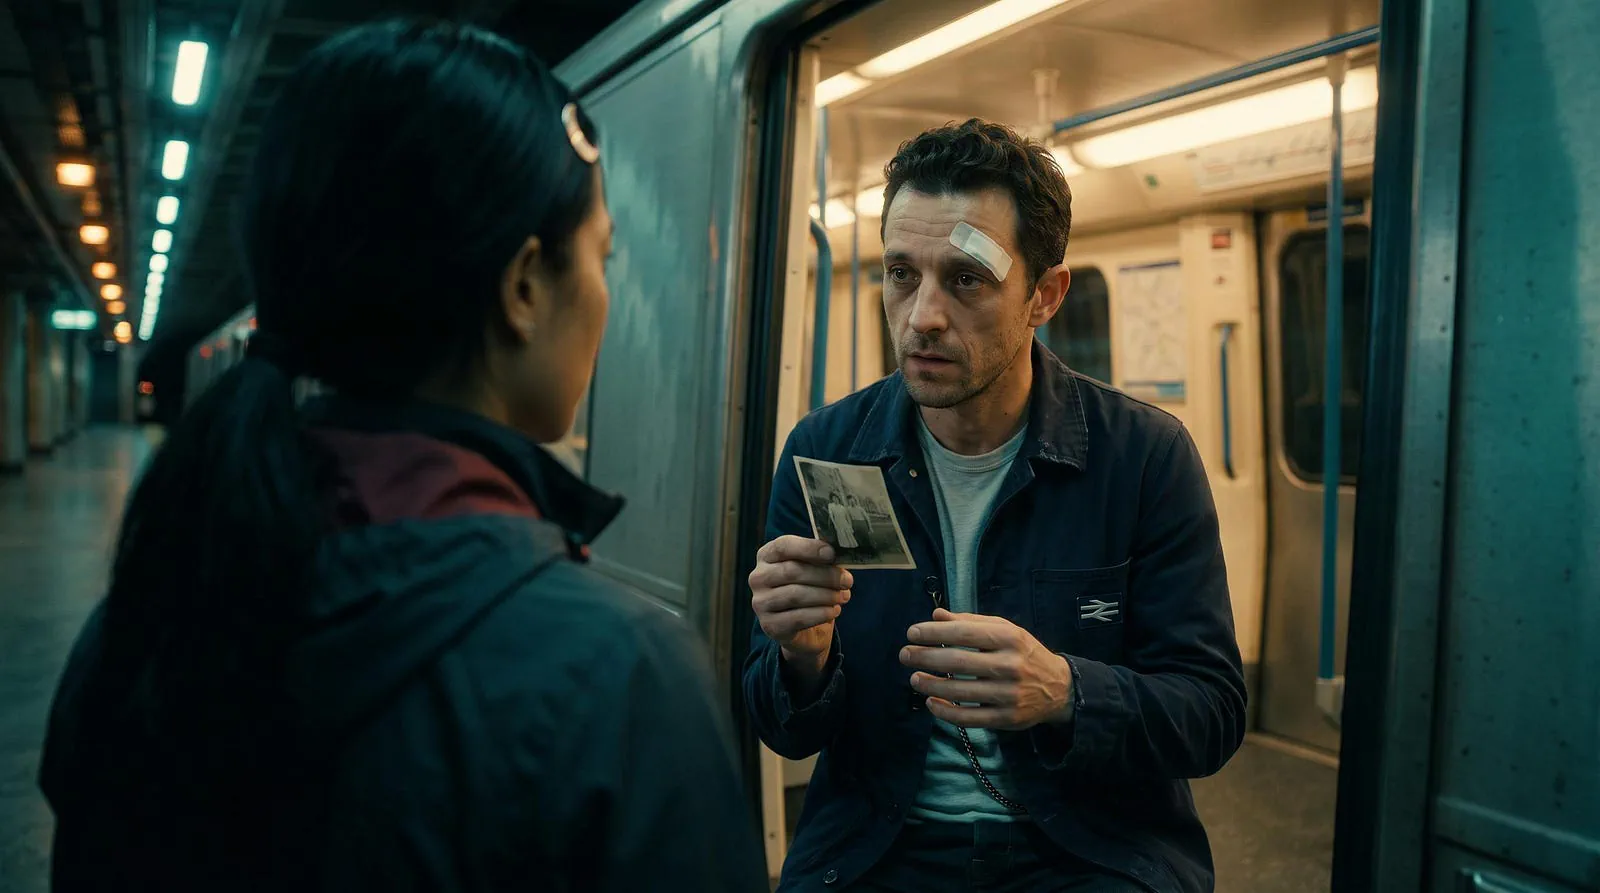
Scene generation example on Artlist’s Studio. Image by Jim Clyde Monge
The hand placement needs to be clear here. I do not want the starting frame to show both characters already grabbing the photograph because that gives the video model too many fingers to sort out.
Scene 4 frame prompt
Prompt: Tight close-up of @Mina at @undergroundmetroplatform holding the bent photograph just below her face. She looks down at it with a skeptical, slightly confused expression. Her silver crescent hair clip is clearly visible above her left temple and matches the clip shown inside the photograph. Pale teal station light falls across one side of her face, while a soft amber reflection touches the other. Background heavily blurred, realistic skin texture, shallow depth of field, restrained emotion, no motion blur.
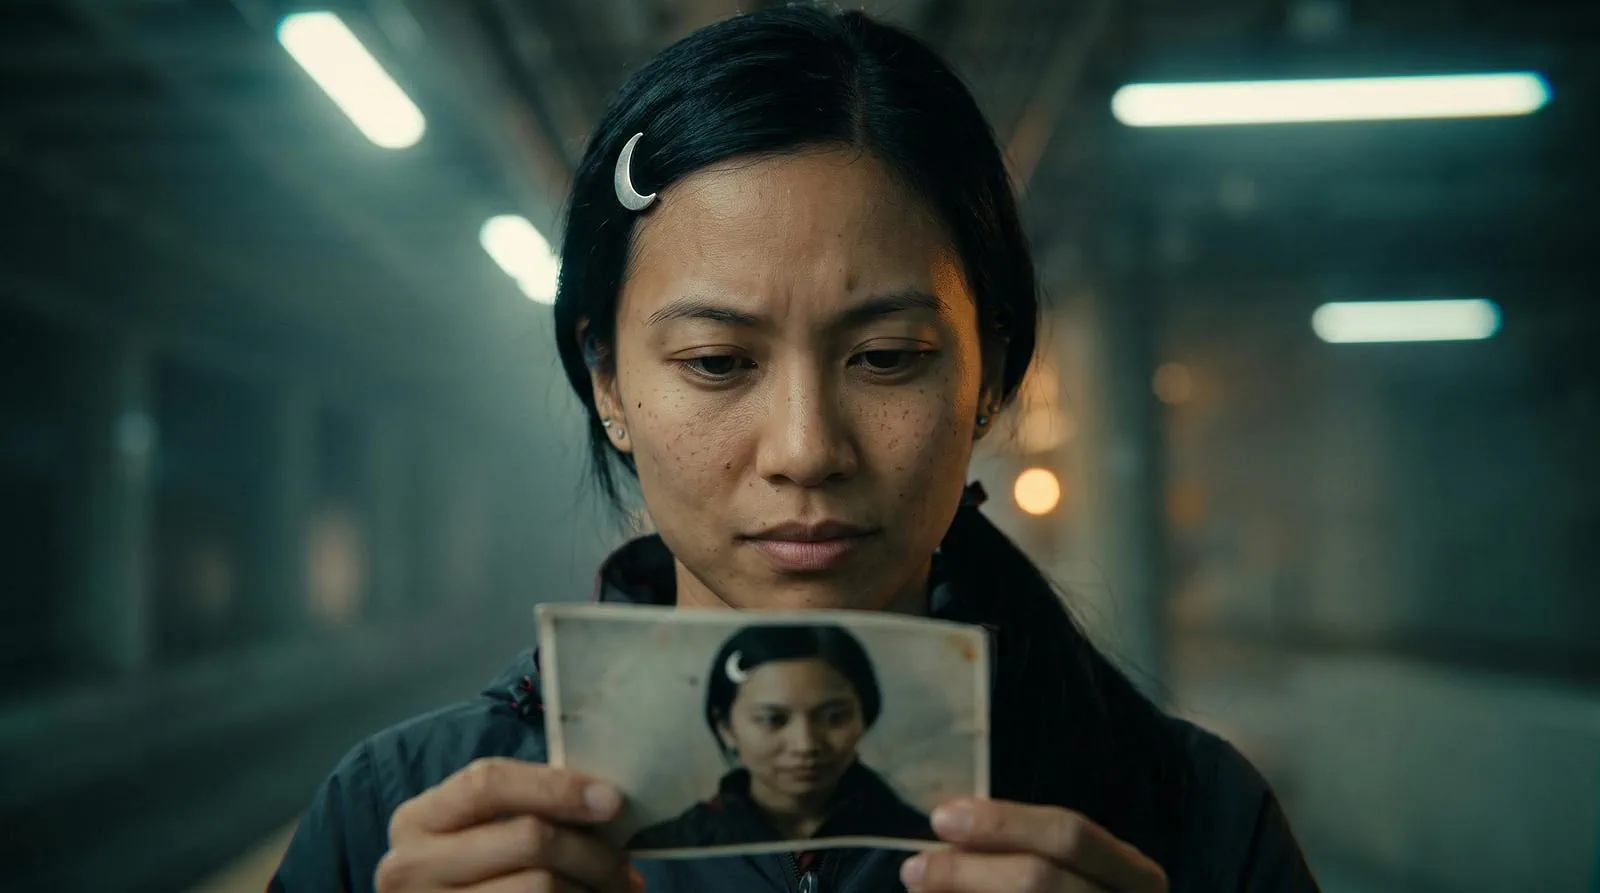
Scene generation example on Artlist’s Studio. Image by Jim Clyde Monge
I’m starting Mina with a doubtful expression instead of full fear. The directing prompt can handle the small change in her face as she recognizes herself in the photograph.
Scene 5 frame prompt
Prompt: Medium profile shot of @Mina standing at @undergroundmetroplatform with the closed train doors directly behind her. She still holds the photograph in one hand and faces @Elias, who appears partly visible near the edge of the frame. Mina’s body is angled toward Elias, but her eyes have started to drift toward the train. The carriage interior behind the glass is dark and empty. Cool teal platform lighting, faint amber reflection on the wet floor, station speaker visible above the doors, natural posture, no motion blur, no readable text*.*
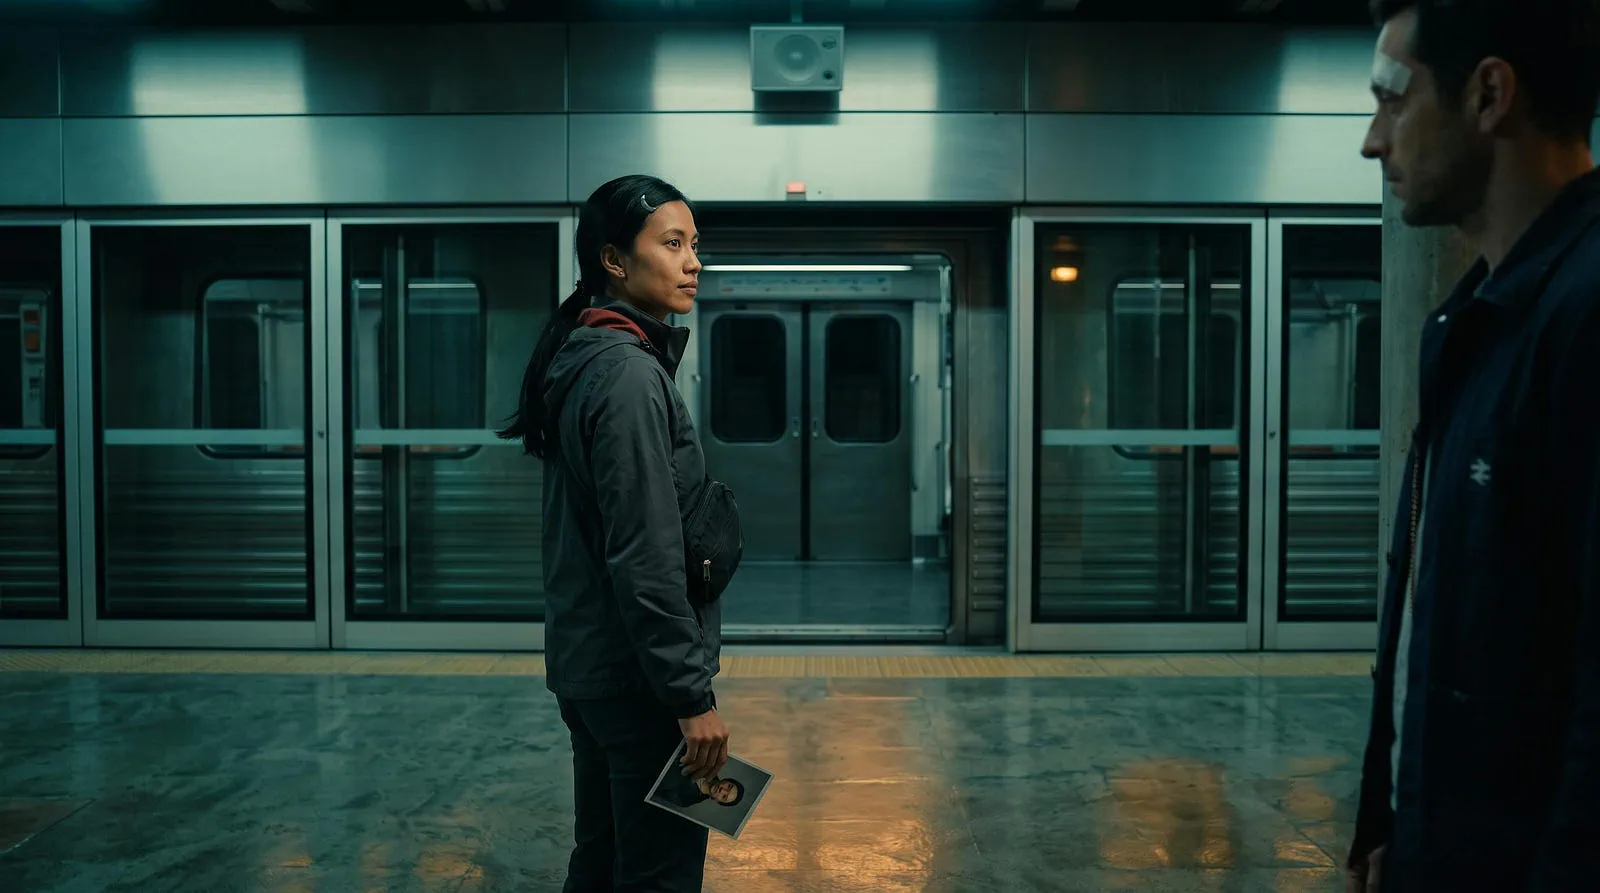
Scene generation example on Artlist’s Studio. Image by Jim Clyde Monge
The doors are still closed in this frame. Their opening, the white light from the carriage, Mina turning around, and the station announcement all belong in the video prompt.
Scene 6 frame prompt
Prompt: Wide medium shot of @Mina and @Elias standing together at @undergroundmetroplatform in front of the open train doors. @Mina is closest to the carriage, with one foot near the entrance and the photograph still in her hand. @Elias stands slightly behind her, watching the empty train interior. Cold white light spills from the carriage onto both characters and across the wet platform. The tunnel beyond the train remains dark, teal and amber station lights still visible, tense but quiet composition, realistic proportions, no motion blur.
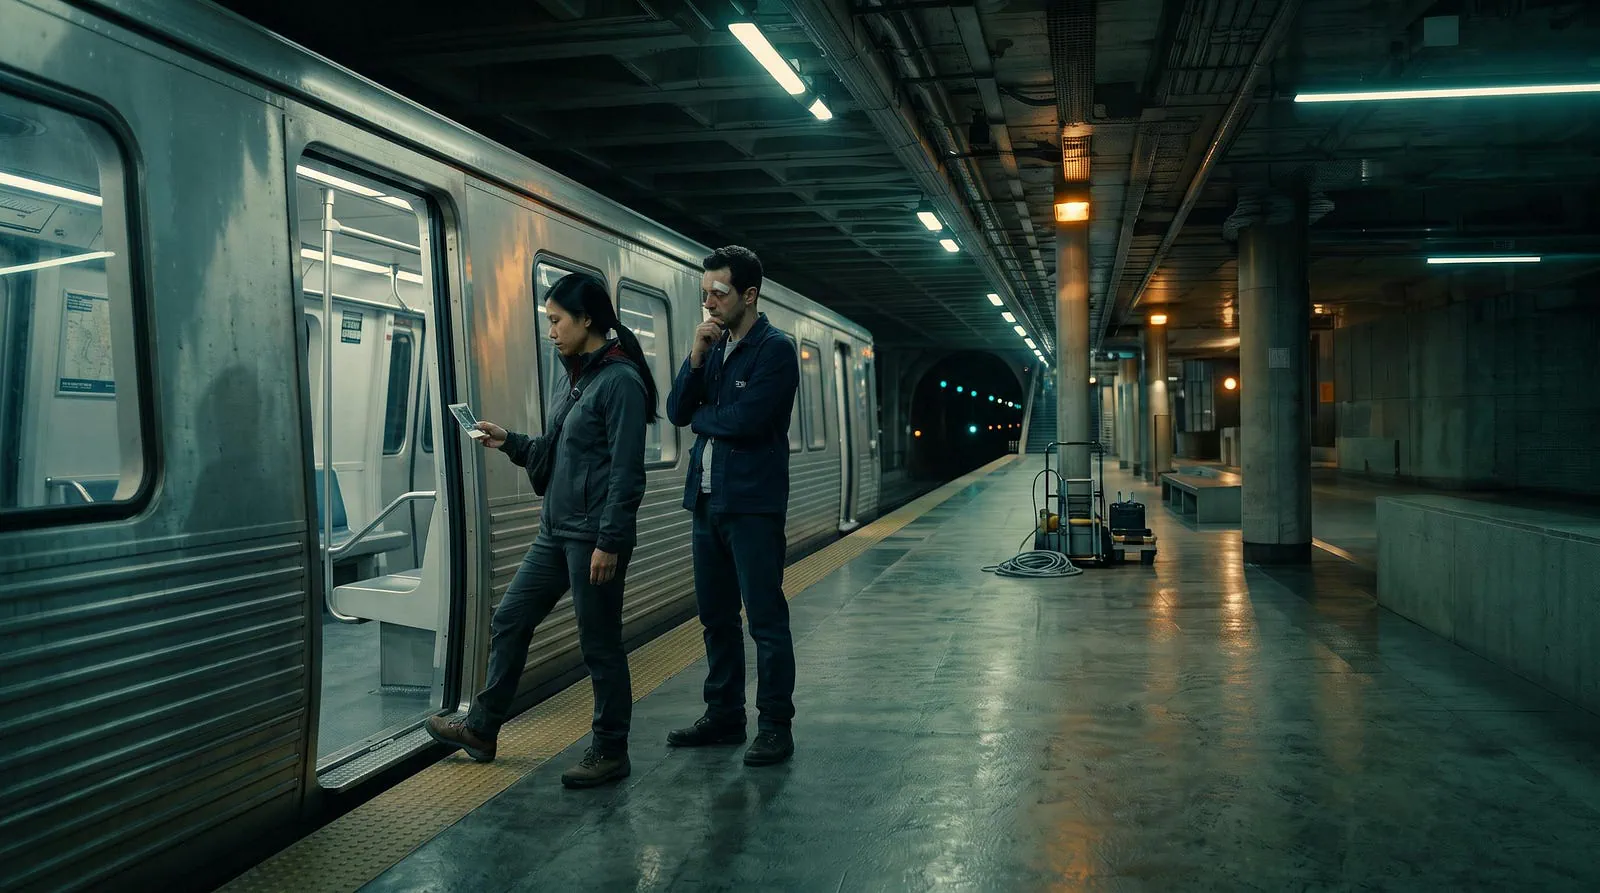
Scene generation example on Artlist’s Studio. Image by Jim Clyde Monge
This frame picks up right after Mina turns toward the open carriage. From here, the directing prompt can make her step backward, close the doors, send the train into the tunnel, and finally shut off the lights.
I kept movement out of these prompts on purpose. The start frames only need to establish where everyone is standing, what they are holding, and how the shot is composed. The movement, dialogue, sound, and camera direction can stay in the six video prompts that follow.
Direct the Six Shots
These are still dummy prompts. Each one would have the correct Character, Location, and prop references attached, so I do not need to describe Mina’s face or the station all over again.
To start generating the videos per scene, switch to the Directing tab and make sure the starting frame for each scene is correctly set. Next, add your video prompt, submit, and wait for the scenes to be completed.

Directing example on Artlist’s Studio. Image by Jim Clyde Monge
Here are all the prompts used for each scene in my demo:
Scene 1 prompt
@Mina enters the empty platform from the stairs and slows when she notices someone near the final carriage. Her wet courier jacket catches the overhead light. Begin with a wide establishing frame, then track backward as she approaches. Natural walking motion, restrained expression, rain ambience, distant electrical hum, no dialogue.
Here’s a 5-second sample video for this prompt:
Scene 2 prompt
@Elias sits on a steel bench beneath an amber service lamp, holding the old photograph. He looks up at @Mina but does not stand. Medium shot with a slow dolly in. His breathing is controlled but strained. He says quietly, “If you board that train, the station does not make it to morning.” Keep the background train still.
Scene 3 prompt
Over-the-shoulder shot from behind @Mina as @Elias extends the bent photograph toward her. She takes it without looking away from him. Focus shifts from his face to the photograph between their hands. Minimal body motion, realistic fingers, low station ambience, no camera shake.
Scene 4 prompt
Close-up of @Mina studying the photograph. Her suspicion changes to recognition when she sees the silver crescent hair clip in the image. Very slow push-in, shallow depth of field, no exaggerated fear, no dialogue. End with her eyes lifting toward @Elias.
Scene 5 prompt
The train doors slide open behind @Mina, filling the platform with cold white light. She turns halfway toward the empty carriage as the station speaker says, “Passenger Mina Reyes, the final train is waiting.” Medium profile shot, gentle handheld movement, realistic synchronized announcement, increasing electrical hum.
Scene 6 prompt
@Mina steps backward beside @Elias as the train doors close and the empty train accelerates into the tunnel. Track the departing train for a moment, then pan back to both characters. Every tunnel light turns off in rapid sequence toward the camera. End on darkness with the sound of the brass pocket watch stopping.
Once all the scenes are ready, open the Editor dashboard and export the final video. Here’s a snippet of the final result:
Pretty cool, right? I know this is only a snippet of the whole microdrama I am working on. But you can already see the potential here.
With regard to the quality of the video, things can be pushed even further. I’d start with Seedance 2.0 in Studio because the story is already broken into short shots and I want the higher-resolution output.
Seedance 2.5 would be tempting for a longer scene with native audio. It can run for up to 30 seconds and take as many as 50 image, video, and audio references, although the available resolution and Unlimited coverage depend on the mode and plan.
Continue Shots Instead of Starting Over
Studio also lets me pause a clip and carry one frame into the next shot. That should help around the photograph handoff and Mina turning toward the train. Her exact pose comes across with the frame, so I am not trying to describe the bend of an elbow or the position of a hand in text.
The usable clips go onto the Studio timeline, where I can reorder, trim, split, preview, and export them. That should be fine for a first cut.

Editing example on Artlist’s Studio. Image by Jim Clyde Monge
I’ll probably finish the film in Premiere Pro or DaVinci Resolve because Studio is still pretty basic for sound mixing, captions, color correction, and exact timing.
What Else Should You Know About Artlist?
There are a few more Artlist features I would not ignore.
Flows is a node-based canvas that connects prompts, references, image generators, and video generators. For another film, I could connect a text prompt to an image model and feed the chosen storyboard frame into a video model.

Flow tool on Artlist. Image by Jim Clyde Monge
Old results stay inside each node, which is handy when the newest generation somehow comes out worse than the first one.
AI Apps cover the quicker jobs. There are more than 70 for things like UGC product videos, camera moves, loops, product ads, and upscaling. They are mostly for familiar formats where I just want to upload something, choose a look, and get the result.

Apps collection on Artlist. Image by Jim Clyde Monge
Video templates are a different thing. These are downloadable titles, transitions, and motion graphics for After Effects, Premiere Pro, Final Cut Pro, and DaVinci Resolve. They are not AI Apps and cannot be edited on the Artlist website.
The old Artlist catalog is still useful here. A stock train sound will probably be more reliable than whatever the video model creates, and a two-second city shot may already exist in the footage library. There is no prize for generating every single frame with AI.
There is a Premiere Pro plugin as well. It brings the Toolkit and Artlist library into the editor, which should cut down on some of the downloading and tab switching.
I also need to watch the credits. Toolkit and Studio draw from the same balance, with the cost changing based on the model, duration, resolution, and other settings. The Unlimited option only covers selected models and modes. Fair-use and parallel-generation limits still apply as well.
Most of the early experimentation can happen with cheaper image generations. I’ll save the more expensive video runs for the point where the faces, locations, and shot list are already settled. Otherwise, that monthly balance can disappear surprisingly fast.
Artlist says creators keep the rights to their own AI generations after the subscription ends, provided the work follows its terms. Stock files and assets downloaded from Explore follow different rules. I’d read the exact license before using those in client work because the difference is easy to miss.
Final Thoughts
Alright, that’s about it. I hope you enjoyed reading this little guide.
The whole process starts with the story. For this example, I wrote a small plot, broke it into six shots, created the characters and locations in the Toolkit, prepared the voices and sound, then moved everything into Studio. The genre can change, but I’d follow roughly the same order for another microdrama.
Personally, I like having the AI tools and stock catalog under one account. I can generate the characters, grab stock sound effects, make a voice, test a couple of video models, and assemble a first cut without moving files through five unrelated services.
I also have to give Artlist credit for making these tools available to people who are not filmmakers. Someone can mess around with a weird 20-second story just for fun, while a more experienced creator can bring a script, references, and proper editing into the same toolset. Not every generation will work, of course, but trying the idea is now much easier.
I’ll replace the placeholder images and reactions once I generate The Last Platform for real. In the meantime, what do you think about the tools covered in this guide?
Would you start with the Toolkit, build something in Flows, or jump straight into Studio? Let me know in the comments.
FAQs
What is the difference between Artlist AI Toolkit and Artlist Studio?
The AI Toolkit is mainly for generating individual images, videos, voices, and music. Artlist Studio is better suited for longer projects because it lets me build characters and locations, frame shots, direct scenes, and arrange the clips on a timeline.
Does Artlist have the latest AI models?
Yes. Artlist regularly adds newly released image, video, voice, and music models to its catalog. Current options include Seedance 2.5, Kling 3.0, GPT Image 2, Nano Banana 2, Veo, Sora, Lyria, ElevenLabs, and several Artlist models.
Can I create a complete microdrama inside Artlist?
Yes, especially for a short first cut. I can generate the characters, locations, voices, music, and individual scenes, then arrange and trim the clips inside Studio. I would still use Premiere Pro or DaVinci Resolve for more detailed sound mixing, subtitles, color correction, and exact timing.
Which Artlist video model should I use for a microdrama?
It depends on the scene. I’d use Seedance 2.0 for short, higher-resolution shots inside Studio. Seedance 2.5 is more useful for longer scenes with native audio and several image, video, or audio references. Since the models are available from the same Toolkit, I can also test Kling or Veo when a scene does not work well with Seedance.
Can I use Artlist’s AI-generated videos commercially?
Artlist says creators can use their generated outputs in commercial and client projects under its license terms. Generated outputs and stock assets are not handled exactly the same way, though, so I would still check the license attached to the subscription before publishing paid client or broadcast work.
Sources
- Artlistartlist.io
- AI Toolkitartlist.io
- Artlist Studioartlist.io
- Jim Clyde Mongemedium.com
- https://vimeo.com/1223629357?fl=pl&fe=vlvimeo.com
- https://vimeo.com/1223630486?fl=pl&fe=vlvimeo.com
- Flowshelp.artlist.io
- AI Appsartlist.io


